Wednesday, December 24, 2014

Joy to You Today and Always!


I don't know why, but I completely fell apart this Christmas. It was the most disorganized, discombobulated and all around dizziest of holidays. Whew! I'm not quite sure what happened. I was a crazy year. However after a very lovely day with my amazing boys and their wonderful families and I have come to the conclusion that its all good in the end. Its not about the all the wrappings of the season, its love.

To be so loved and to love so deeply is the greatest gift of all.

I do have to tell you how dreadfully sorry I am to have not finished my pincushion tutorial for you by Christmas. Please accept my most sincere apology. I just don't know what to say. Do know that I really tried. With the new baby coming, my mom's passing and a recent family upheaval, the last few weeks literally left me with not a moment to spare.

I will try to get those last flowers up by this weekend, just in case, you have an understanding gift recipient or a late holiday gift exchange. The final touches are not too hard. In fact, if you go to the Classic Pincushion Tutorial, it will walk you through the final construction of this pincushion.

I would love to extend a holiday discount to you all in my Etsy Shop.
You may take 15% off any Ready To Ship Item from now until December 31st.
Just use the coupon code FiberSanta15.

Here a just a few items you may choose from. You might recognize some of the textiles from a recent post.
Pretty Vintage Doily on Cherry Red Felted Wool

A Round Patchwork Pincushion in fun 1930's reproduction prints.

A Sweet Vintage Embroidery with Red Rick Rack Trim


Here is my newest little Owl Pin Assortment. The owls were so darn cute I just had to give them a special little home.


I wish you all the Happiest of Holidays and a very creative and wonderful New Year!

Tuesday, December 9, 2014

Summer Garden Pincushion Tutorial Part 4 and 5


I hope you haven't given up on me! My life has been so crazy busy these days. I have been struggling with everything lately. Whew its been a tough year. The good news is that I am going to be a grandma for a second time! The challenge has been that this little one is giving his poor mom a bit of trouble. She is healthy and fine, but poor mom has needed lots of rest. I have been blessed with taking in my 1st grand daughter more than usual. She is the love of my life but her enthusiasm and energy keeps me hopping.

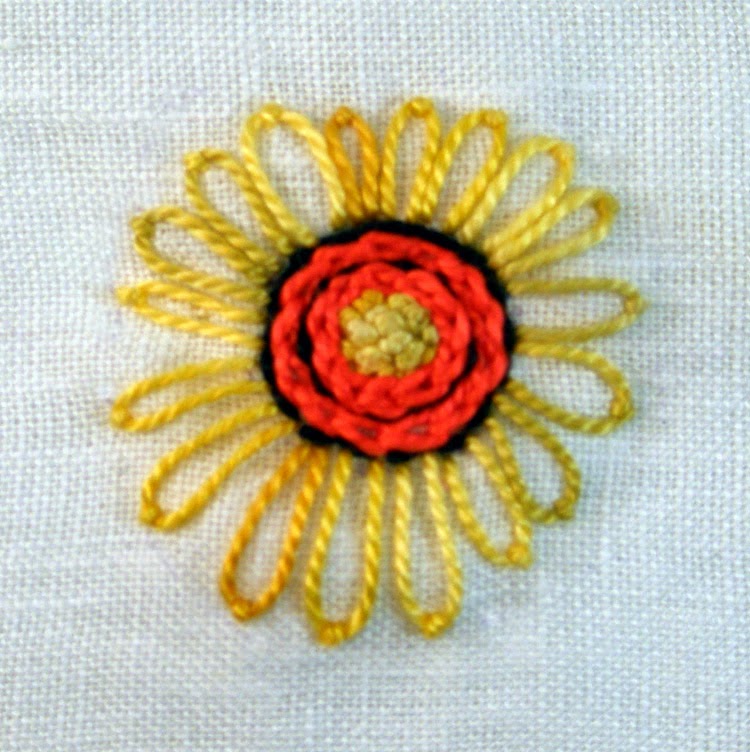
I promise to give you the final flowers in the next week. Here are 2 fun flowers. I put them in every pincushion I make. I also get requests for pincushions with nothing but sunflowers. Here is one of them-


One of my favorite flowers is the daisy. I gave this one a bit of flair. It may be more of a Gerbera Daisy which has so many fun color possibilities. As with all of the flowers in this tutorial, please feel free to mix up your color choices. If you do, I suggest that you do a little test flower on a scrap of linen, just to see how things will look when different colors play together.

You won't have to learn any new stitches this time. We will be using a few old favorites for both flowers.
The Lazy Daisy is the perfect petal stitch. When you add them together, one after another you will be making the Chain Stitch.
That same stitch can take on a new look just be opening up the base of the stitch. That is called an open Lazy Daisy. When the stitches touch at the base, it is called a Closed Lazy Daisy Stitch.

Here is a simple illustration. (please check back for photos)


I think you will find that most of the embroidery you may do involves just a few stitches. The variation comes in how you place them and the size and color you choose.
here are some examples how the Sunflower looks just by changing up the colors.


The daisy is just as easy. (I'm having a bit of a problem getting photos to load. Check back soon to see examples)


If you shrink and simplify the daisy, use a variety of blues, you suddenly have a Forget Me Nots. How fun is that!?!


I love them all! Even the pincushion on top is another variation on the same flower using a different combination of stitches. It can be just that easy.

I have 2 downloadable instruction sheets for you.
Summer Garden Sunny Sunflower Section
Summer Garden Dearest Daisy Pincushion Tutorial

Here are a few larger photos of the sunflower and daisy. Its hard to see each stitch when showing 3 strands of embroidery floss. I've used Perle Cotton in size 5 to show you how I've created these flowers.


I am having a bit of problems getting my photos to load so I am going to end for now. Please check back in a day or so. I hope to have all of the illustrations up soon.

The next post will have our final flowers. In the interest of giving you enough time to get your stitching done, my posts may be a bit more brief than I had hoped. I will be giving you at least 2 more flowers. The last post will include Hydrangeas and Geraniums. They are incredibly close in how they are stitched, so you will find them to be very easy to make. In fact, you know the stitches. If you are impatient, give them a try by looking at the completed pincushion on the top of the page. Use a bit of practice cloth the first time you give them a try. They have such tiny stitches!

I know you would love to have the roses on your pincushion. They involve one last new stitch. I'll be tackling that flower next. The rose involves a bullion stitch center, surrounded by open lazy daisy stitches. They will be easier than you think.
If you are adventurous, there are many rose tutorials on-line using a wide variety of stitches.

I hope you had a very wonderful Thanksgiving. I know that I am very grateful for your support, your kind comments and the creativity we share.
I'll be back soon!


Friday, November 7, 2014

Lots of Goodies...

Hello to you all! I have a feeling we are all busy as the holidays approach. Anyone who gives hand made gifts knows what I'm talking about. I believe that those are the best. I can't remember the last time I gave my mom a gift from a store. She treasured every one of them from warm blankets to cuddle up with to little warm little stitched messages of love. It doesn't take much to show someone you care. I hope you all find time this year to give a bit of yourself to those you love.

I wanted to give you an update on the next section of our Summer Garden Pincushion. I'll be posting 2 flowers in the next post. They use the same stitches. Better yet, there will be nothing to learn. The daisy and sunflower use stitches we already used. The way they come together is what makes them so pretty and different from each other. Check back early next week for that lesson. I will also be showing you some progress on a custom order I am working on. Occasionally I get a request for a new flower. This time its the Poppy. While I don't quite have the time for an instruction sheet on this flower, I'll show you how I designed it. I hope that gives you the inspiration to play with some ideas you may have in adding your own touch to your pincushion!

Between orders and tutorials I'm trying hard to squeeze in some new items for my Etsy Shop. Here are two new additions I added today. I have so many new fabrics and trinkets on hand. Its hard not to take some time to play now and again. This one is a double decker doosy! Its bigger than most, but that print and the large ceramic button just begged for some room to play. Find it here.


This pincushion is a variation on my tomato design. I've been admiring some fussy cut quilts lately. I picked up a sweet paisley print and I wanted to do a bit of experimenting. There will be more versions on fussy cuts soon. Its fun to let the fabric work every once in a while! If you saw my stash you would be itching to play with fussy cuts too! You can find this pincushion in my shop here.


I always have something in progress. I encourage you to take 10-30 minutes a day just to be inspired. Look at your new or old fabrics and let them tell you what to do. If they are quiet, just start cutting! I have a stash of strips in measured widths and some wonky pieces at the ready at all times. When I have a few moments I pick up a book and give a block or a stitch a try.


Here are a few of my current adventures. I actually have a box of blocks and embroideries! Some are dead ends and some are gems just waiting for a debut. If I didn't play now and again I think I would suffer from boredom burnout. You can only make the same thing just so many times before it gets stale and totally non-fun.


I have been so busy with custom orders that my playtime has been limited to a few minutes here and there. I feel total guilty the whole time because I know people are waiting for their orders. It is getting so hard that I finally had to decide to not take custom orders until after the holidays! That has not been well received. I am not good at saying no, but the requests continue so for now I've been able to say, "Can you wait till January?".

If my customers could just see all the pretty things I have in my head just waiting for uninhibited playtime, I know they would have more patience!
Then it dawned on me. If they could see what I see, maybe they would be as excited as I am to see what is coming if I only had time to play.
So here is a glimpse into the goodies I have been adding to my stash. When I can finally sit down with them and let them talk to me, there is going to be a creative party like no other!
I have so many ideas in my head I'm about to burst! So if you have seen my "No Custom Orders" note in my shop, please be patient.

The best is yet to come!

Just look at these....


These are just the fabrics! Did you see those lovely feed sacks! They are to die for. I'll be sharing a tutorial next year on how to design with prints. If you want some of your own, I got most of these feed sacks from Vintage Notion on Etsy. Jeong is lovely to work with, the service was outstanding and her selection is truly amazing.
I have new books with lovely wool felting ideas, patchwork books, applique books and then there is my brain.. just brimming with ideas.
I have sooooo many pretty buttons, crazy quilt embellishments, vintage doilies, buttons, laces and rick rack in a rainbow of colors! Its nearly impossible to be surrounded with these and not be able to play with them! Could you?

Well, now that I am drooling once again, I better stop. I have some work to get done. Maybe there will be an end in sight to my responsibilities and play time will be here. I'm hoping to fill my shop with holiday goodies featuring some of these wonderful materials.

I just finished a pear using these fabrics. I won't be taking orders for them till February. I just wanted you to see what I've been working on and how these fabrics inspired me to be unique in my work. This was just a joy to make. I hope the person who receives this is thrilled. I think it is one of my best yet!


In the meantime, I can't wait to share my new flowers with you. I think you will enjoy your play time with these pretty posies!

And remember.... its essential to find your own adventure. Take time to do the things that inspire you. Be sure to set a few boundaries. Yes dinner may be late, but you will whistle when you cook if you take time to feed your soul first!


And..more importantly... share your creative spirit with those you love. If you think your work isn't good enough, you are very wrong. A gift from the heart and from your hands is more precious than gold. You will touch those you love when you give a bit of yourself.


Talk to you soon!


Friday, October 3, 2014

Summer Garden Tutorial Part 3 - Mums for Mom!


I would like to dedicate this Pincushion series to my mom, who recently passed. It has been hard and I so appreciate your kind comments and your patience in waiting for this next step. She was my mentor, my best friend and my greatest supporter. It just seems so appropriate to create the Mum flower this week. How perfect! I know she is looking down on us and enjoying the creativity we share. Here is to you MOM! I love you!


This project has been chosen by DMC in the Mid-Summer Inspiration Feature! That makes all of us stars! How exciting is this. It is such an exciting year for Fiberluscious and all of my fellow fiber artists. I had 10 followers for the first 2 years of my blog. I've been growing fast and I am so grateful for all who have joined me. We've come along way baby!


Lets create some mums!
This is such an easy section. The new stitches to learn are the straight, stem and fly stitches. The french knot was created in the Lovely Lavender section.


You can find great videos on the web to learn these stitches. I have a page on my blog showing all of the embroidery stitches we will be using on this pincushion. Find them here.

The illustration below will show you the steps for creating the Mums for Mom section. I'll also talk you through them.
I have a Downloadable Instruction Sheet for the Mums for Mom Instruction Sheet you can use to create this section. It includes the DMC colors used along with a stitch legend and step by step instructions. Find it here.
If you need help with how to create each stitch, go to my Stitch Tutorial Page. Just follow the steps. If you would like to print the below image, you can just click Here.


Step 1
The tutorial download has the pattern for this section on it. Here is the actual size image. I recommend that you sketch this one out freehand. It can be hard to sketch on bumpy fabrics. So, loosely sketch your flower design onto your linen. Be sure to use a water soluble or friction (heat erasable) pen. You don't have to be exact.
As you can see here, I actually made a few adjustments as I stitched so each part of the flower fits in with the leaves, stems and buds.


Step 2
Begin by stitching the deep orange petals using a straight stitch. Its one of the easiest and most commonly used stitches in all of embroidery. Be sure to leave a small opening in the center of the flower to allow for more petals and french knots. I used a deep orange color - DMC 900.
Stitch with 2 strands of floss for this section.

You will need to stitch all of the large flowers first. Don't forget to tie off your threads before you move on to each flower.


Step 3
Next add the inner, lighter orange petals to each mum.
These should be shorter than the deep orange. Again, you need to preserve a small spot in the center for your french knots.
I used a golden yellow for this demo so you could see them better. For the actual mum use DMC 921
Just a thought- you don't have to create orange mums. You can even add a few more layers and make this flower a zinnia. Its all up to you!

Step 3
Add about 3 french knots in the center of each flower using a bright yellow floss. Aren't they cute?


Step 4
I used a bright green, DMC 904 for the stems, buds and leaves. It is easiest to start from the bottom and work your way up to the top of each stem. That way you won't have to tie off so often.

Use a stem stitch for the main stems. Use a few back stitches before you add each leaf or flower buds. Here is how it should look and a fast tutorial for the stem stitch.


When you get to the leaves attach them with one back stitch. The leaves are created with a fly stitch. I'll show you a bunch of fun leaf stitches at the end of the tutorial.
Here is how to make a fly stitch and how it should look when you stack a few fly stitches together to create a leaf. As you work up the leaf shape, start small. Gradually wide your stitches. The last few stitches should get narrower quickly. To create the point, add one straight stitch to the tip of the leaf. Easy peasy!


Next create the base for each bud. This is accomplished with 3 lazy daisy stitches. Start with one center stitch. Then add one stitch on either side of the center stitch. Keep them small.
We learned the lazy daisy stitch in the lavender section. If you need a reminder just go the stitch tutorial section of my blog.

Step 5
Finish the bud by adding a few lazy daisy stitches to the green base stitches from the last step.
You will simple add 3 or 4 lazy daisy stitches as in the base in green. Use the deep orange floss, DMC 900.
Here is what it should look like.


You are finished with this section! I use the some of these same stitches to create my other embroidery works.
For landscapes, the straight stitch is essential in creating grass, short stems. Put them together to create the satin stitch. Line them up one after another and you have the back stitch.
The stem stitch is perfect when your stems curve. The tighter the curve, the smaller your stitches should be. The stem stitch is often used in lettering.
If you want your stem stitch to look thicker of if your curves look choppy, wrap your stem stitches. Just bring another strand of floss up at the beginning of the stitch line and wrap each stitch. Don't pierce the fabric again until you get to the end of the stem.

I stitched a little sampler to show you how to create other types of leaves. I labeled each stitch used. Look them up on the web and give them a try.


If you are just starting today with this pincushion, here is what you missed. Click on each section to find the original post or PDF file.
Past Posts
Embroidery Floss Basics
Part One Pattern Template, Tools and Tips
Lovely Lavender Section


Click on these downloadable sheets (PDF files) to tie it all together.
Embroidery Floss Basics
Summer Garden Pattern Pattern Template
Lovely Lavender Section Guide
Mums for Mom Section Guide


Tip
Be sure not to float your threads across blank spaces as they will show from the front. To avoid this I just weave the floating threads into existing stitches on the back of my work.
When I create knots I use a quilter's knot at the start.
When I am at the end of a section I just make a knot with one loop. Before I cut my strands I weave a few stitches after my knot into existing stitches. I've seen this done on vintage linen towels and I think it makes the knot less likely to work its way out, especially when the stitched article will be washed. It also makes the ends invisible from the front.

Thanks for stitching along with me. I promise that the next step will not take as long as this one did. I have a busy Etsy shop right now so I'm guessing it will take 2 weeks for the next section.
As we repeat some of the stitches these will be easier for you and I.
Lets try the Sunflower Section next! Its so pretty. It is a bit more time consuming to create, so we will start it before the holidays start creeping up on us.
Have fun with your mums! See you soon!


Sunday, August 31, 2014

The winners of the Pinterest...Pins and Homespun Magazine are..............


Pippirose from NW Ontario Canada! won the Homespun Magazine and a set of Stick with Me Pins

Joan from McMinnville Oregon won a set of Stick with Me Pins (see note below)* Joan- Please see the important note at the end of this post.

I would like to give you all a 10% off coupon code to use in my Fiberluscious Etsy Shop! Just type in the code, FiberBlog10. (This offer expires January 1st, 2015).


I hope you love your prizes. The magazine is so very lovely and fun!


The Pin Assortment includes 10 assorted flower topped stick pins. Each pretty, glass flower sits atop an extra long pin. They are boxed and wrapped with a sheer bow. Perfect for giving or keeping!


I want to thank you all for entering my giveaway. It is always fun to share my passion for creating fun fiber projects with you.

It has been are really hard month. My mom passed away recently. She was my dearest friend. She was instrumental in nurturing my creative spirit and taught me that there is nothing I cannot do if I try hard enough. She was an artist too. She was my muse and inspiration. I hope you understand that it was hard to chat with you about your all of the kind compliments you gave about my blog and my work. It was so nice to come home each day to meet so many new creative spirits.

I know that the Homespun people are so happy that you know a more about them. In reading the magazine, Its east ti see their dedication to sewers and crafters like us. Half way around the world there are women and men, striving to breathe new life into traditional art forms such as embroidery and quilting. Its a small world when we think of how much we are all alike.

I will soon be posting the next flower for the Summer Garden Pincushion and show you how to embroider a variety of leaf shapes. I will be dedicating this project to my mom. I know her joyous way of seeing the beauty in nature and in the way we express ourselves in the art we create will inspire us all as we work on our pretty pincushions.

I have some more exciting news to share!
DMC-Threads.com liked my Summer Garden Project so much, they featured it as one of their Mid-Summer Inspirations! I love their products and am happy to feature them in this project. I was stunned that they noticed my little blog and am grateful for their support. Life is full of surprises!

Well, I hope you are enjoying the last beautiful days of summer.
Thanks so much for joining in on my giveaway.
Sign up for my newsletter and I will let you know when the next one rolls along. I normally don't send a lot of newsletters out so if you are busy, like me, I promise not to fill your inbox with offers or advertisements.


Bye for now and happy stitching!


*Dear Joan- Please email me at jillverbick@gmail.com. I do not have your contact information and I need your address to send your prize!

If I do not hear from Joan by September 7th, I will draw another name and announce a new winner.
In future giveaways, contact information must be provided with each entry to win.


Monday, August 11, 2014

Giveaway- Pinterest...Pins and HomeSpun Magazine!


I owe so much to Pinterest and the lovely people who pin my work. I have so many new customers and contacts via Pinterest. I've discovered so many amazing techniques and lovely creations and talented artists. I have been fortunate to have been discovered by many others in return.

I can spend hours on this site. I love to just soak in all of the crafty goodness. It amazes me how many talented artists there are. I am inspired by their out-of-the-box way of patchworking, stitching, felting, photographing and just plain making.I learn so much, not only from the tutorials of the many generous souls who choose to share their crafts with all of us. I also discover what people like and how much they like it. That is an invaluable tool for a Etsy shop like mine.
Now I can't give you Pinterest, but I can offer a glimpse into my favorite Pinterest Pins. Here are my boards.

I am grateful for how Pinterest has changed my life. It never ceases to tickle me when I run across one of my creations. So when I was approached by Homespun Magazine, published in Australia to have my Flying Geese Needle Case in their August-Best Patchwork in their "Best of Pinterest" Pin feature, I was honored and extremely thrilled!


In honor of this auspicious occasion, I am giving away 2 "Stick With Me" pin assortments! Two winners will receive 10 assorted Pins in a Gift Box, just like the pin assortment you will find in my Etsy Shop here.


Look at all these pretty pins! You'll receive 10, already boxed, bowed and ready to give to your favorite sewer to add to your best pincushion or just to keep for yourself.


How to Enter-
First Visit the Homespun Magazine Facebook page here and give them some "Like".
Check out their Website Here.
Click on their Web Projects Page and write down the name of any of their Web Projects.
Then...
Just comment below and make sure that your contact information is linked to your profile or provide your email address so I can let you know if you won.
To win, don't forget to give me the name of one of the Web Project from the HomeSpun Magazine.

The Deadline to enter is Friday, August 29th. The Winner will be announced On Sunday August 31st !
One winner will receive a "Stick With Me" Pin Assortment along with your copy of the HomeSpun Magazine "Best of Needlebook" Issue. It just arrived and I am in awe of the lovely projects in it. It is much like the Stampington publications here in America. I cant wait to share it with the lucky winner.
The second winner will receive a Stick With Me Pin Assortment only.

This Giveaway is Now Closed.

There is lots to see here, so stay awhile! Sign up for my newsletter and I will let you know when I will giveaway another fun project.

Happy Sewing!


Friday, August 1, 2014

Summer Garden - Part Two -6 Flower Pincushion Tutorial Continued....


Here is a revised Embroidery Floss Basic Color List (pdf) you'll need for this tutorial. .
Please note that I have revised the previous list. I actually forgot to add the color numbers for green! How could I forget green?

Its finally time to start some embroidery!
This is the fun part! Lets start working on your pincushion.
If you have read the previous post, you should have all of your tools at hand.
You should have a sketch, (on paper) of what you want your pincushion to look like.
You should have your linen cut into the round template shape with 6 sections marked off. If not, here is the Template PDF.
You should have lots of colors of embroidery floss.

Part 2 Downloadable Instruction Sheet for the Lovely Lavender Section of this tutorial.

Step 1
The tutorial download has the actual size pattern for this section on it. Its small and its hard to sketch on bumpy fabrics. So, loosely sketch your flower design onto your linen. Be sure to use a water soluble or friction (heat erasable) pen. You don't have to be exact.
If you want to practice your stitching first, a loosely woven muslin is a good choice. If it is too flimsy and soft, starch it first.
You can mark each flower section as we go, or mark the entire pattern. Its totally up to you.


Before stitching, I recommend running a stay stitch just outside the seam line. This will help to stabilize your fabric even more and create a boundary for your embroidery. You will want to stitch just short of that seam line so your stitches will be in the right place once you sew it together.
I don't use a hoop. I don't like that I have to cut a big chunk of fabric to fit the hoop. I also find it tedious. If you are used to a hoop, you know how to set it all up.

Tips about Marking your Pattern-
I love the new friction pens! They stay until you iron them. They come in a variety of colors. They have a nice sharp point. If you hate your design, you can simple iron it off and try again. The lines will stay indefinitely.

Water soluble markers are good to use as well. Be sure to use the kind that you have to get wet to erase. They are normally purple in color. They will stay visible until you erase them. (If you are in a humid climate, beware! They can sometime disappear in a few days.)
Try to avoid an air erasable marker, sometimes blue in color. Like the purple marker it may disappear in humid weather.

If you are a free spirit, you may also create your own sketch! I'm all for originality.
Be sure to leave room for a 1/4" seam allowance around the outer diameter of the pincushion circle.
Do not cross over the section lines. You will be separating each section with Perle Cotton later on.

Step 2
Lets start stitching.
The illustration below will show you the steps. I'll also talk you through them.
If you need help with how to create each stitch, go to my Stitch Tutorial Page. Just follow the steps. If you would like to print the below image, you can just click Here.


Begin by back stitching the stem. Begin at the base and work your way to the top. Don't tie off. When its time to add the leaves just head back down the same stem. Don't tie off. Wrap a few of the bottom stitches. Now move over to the next stem and repeat. I like to complete all the stems before I start the petals.

As you work on the petals do one color at a time. Be organic in the size and shape of your petals. Flowers are not symmetrical nor are they evenly balanced or perfect. Have fun with this part. Don't worry about staying on the pattern. Mix it up a bit and make your own mark!
Once you are finished with your purple petals, dive into your light blue violet shapes until your stems are full of pretty lavender.

Then add some french knots here and there in dark blue. It adds more texture and interest.

Here is a pincushion filled with Lavender flowers. It was my first pincushion in the linen series. You may find that one flower is your favorite. Go ahead and fill your pincushion with it!


Once you get comfortable with this stitch, you can start thinking of alternative flowers. I found that pink delphiniums use the exact same stitches. The shape of the flower is just a bit different. I just put another lazy daisy stitch inside the first. Then I put a french knot into the center of those loops. It looks complex, but like all of these flowers, its the same motions repeated over and over in different places. In fact the leaves are just layers of lazy daisy stitches. Easy peasy! Take a look.


One word of caution when working on a light colored fabric.
Try not to drag one color across the back of your work from one stem to the next. You can often see that floss through the fabric and it looks a bit off. I like to work up and down each stem. If I need to cross over, I do so at the bottom of the stem where there is a lot of petals that touch. Here is kind of what the back of your work should look like. (Note that I have not cut my thread just yet).


Just a note-
Embroidery can relax you and help you to unwind. If you pick this project up and you are really tense or nervous your stitching can reflect that. Beautiful stitching lays nice and flat. If you pull your stitches too tight, your embroidery will pucker. You may also find that you encounter more knots than usual. Take a few deep breaths and relax.

Let that not be an excuse to not work on this! After all our stitching, I'll show you how to block your work.
This is a magic step which makes all your wonkyness right with the world. Think of it as a nice relaxing warm shower for your embroidery.
See my Blocking Your Embroidery post. Do Not block your embroidery until all of your flowers are stitched. I'll let you know when and how then.

Once you begin stitching, you will find that the rhythm of embroidery creates a nice "zen" feeling. All your worries will kind of go to the back of your mind and the colors and pattern will be a wonderful distraction to life's little worries. I love it for that very reason. I think embroidery has actually changed me in a very good way. I find I am more patient, more organized and happier for my embroidery work. I know that may sound silly, but it is true. I know knitters say the same thing. There is something about the repetition and rhythm. Its good for the soul.

I will be back with another flower in a few weeks. I have some work to get done and my mom is not feeling well. I hope It won't take too long. I will be teaching you another very easy and really lovely flower, the Chrysanthemum. The stitches are even easier! So I will be adding a leaf that uses the same easy stitch.

We have a lot of creative folks joining in. Its like a pincushion party!

Friday, July 25, 2014

Summer Garden Pincushion- Monthy Stitch Tutorial -Part 1

One of my most popular pincushions is my "Summer Garden".


This linen pincushion is filled with beautiful embroidered flowers. Each time I create it, I add or subtract a specific flower making each one unique. I may add a butterfly or a hummingbird. Or just fill it with blooms. I love to figure out how to recreate the beauty of nature with embroidery floss. The challenge makes it a fun project to create over and over.

Since this is one of my more time intensive pincushions, I'm going to make it a bit easier for you by only using 6 sections and 6 flowers. This will give you a bit more room to play. Each flower deserves your closest time and attention. With 8 sections and 8 different flowers, it usually takes me a few weeks to complete. This pincushion will be a bit quicker. If you want to create 8 sections, by all means do. You'll just have to adjust your pattern.

I'm going to break this project in sections.
Part One will be getting ready, buying your supplies and creating the template.
Part Two will involve embroidery lessons and how they are used to create each flower. I'll break it down into a few lessons so you can stitch a few flowers each month.
Part Three will show you how to finish up your pincushion. Lets do this in late October. You can check out the Classic Pincushion Tutorial if you want to jump ahead at any point.

I will introduce a variety of flowers to you. There are only about 9 stitches to learn! Each post will take you through 3 embroidery stitches.
I'll show you how to use them to create one or more flowers. That will give you lots of options for your pincushion!

If I were to create one for holiday giving, and I only had a bit of free time each week, this would be a fun project to start this summer.
Since its hard for me to keep up with this pincushion during the holidays, I thought I would create this ongoing tutorial. I will take you through each flower, stitch by stitch. If you are unfamiliar with embroidery, I have a stitch tutorial page showing how each stitch is made.

Each week I will teach you how to create a few flowers. I'll walk you through the stitches required. I will show you how I go from a sketch to a pattern. Then I'll show you how to design your custom pincushion.
If you are an experienced stitcher and you would just like to work from a full printed pattern, watch my Etsy shop. I will add an 8 Flower, Summer Garden Linen Pincushion Pattern to my shop in August. You will be able to follow a specific pattern, purchase floss by color number and follow my instructions on how to finish your pincushion. If you get lost along the way, just pop back here for more detailed instructions.

For this tutorial, each step will have a printable instruction sheet with basic instructions.


So lets begin!
My last post goes into greater detail on purchasing floss, needles and your fabric. You can download my Revised Embroidery Floss Basic Color List (PDF). Here is a JPG if you would prefer that file type- Embroidery Floss Color List JPEG It lists all the colors you will need for this project and more.
If you have read my last post, this next part refers to that information. You can skip down to the picture of the tools you will need. I know you are busy. This next part is a quick overview.

Fabric Choice-
If you are new to embroidery, I suggest you start with a practice cloth. Pick up a piece of linen or linen blend in natural or ecru. The weave should be a bit loose. This makes stitching easy and fun, even if you hands are like mine, a bit worn but always willing.
Other great materials for embroidery are felted wool, wool felt, hessian cloth, or an textured woven cloth with a soft drape. Some inexpensive muslins are great for playing. If you work on quilting cotton or worse, a batik, you may find that the cloth is harder to pull a needle through and if you do a lot of stitch corrections, the holes don't close back up as easily. But, please don't let you fabric choice get in your way of creating this project. If you are determined, you can work with any cloth you have on hand.

Tip: There are times when I like to stitch on batik or I may need to pull a needle through multiple layers of fabric. I keep a small, jeweler's pliers handy. This is a great tool to keep you from straining tired or arthritic fingers. It is also the perfect tool for bullion stitches with many loops. Just be certain that your pliers has smooth jaws or you will scratch your needle. A dull, burred or scratched needle is your worst enemy.

Needles-
I like a thin tapestry needle, size 24-26. It has a semi-blunt point, but because it is so fine, it is sharp enough to piece through a loosely woven fabric like linen. The long thin eye is easy to thread.
I also use Chenille needles in the smallest size available, such as size 24 or 26.

Another great choice is a size 8 Embroidery Needle with a sharp point. It will work with most any fabric you have. The needle is larger than most needles and the eye is nice a large so threading your floss is a snap.

Embroidery Threads-

I use DMC embroidery floss with 6 strands. I will give the color number when I have it, but please feel free to substitute at any time.
I would not recommend using a budget brand of embroidery floss. You will find that it knots up more often. The colors may be bright, but they may fade much sooner than a quality thread. If you are going to invest a lot of time into your work, you want it to last, and you don't want to spend more time fighting your threads than you do stitching your stitches. When each hank of floss is less than 40 cents each, why not splurge!

I recommend that you pick colors that appeal to you. If you are going to do a lot of embroidery, which is very addicting, go out and buy about 20-30 colors. You will need greens, yellows, pinks, reds, purples a few blues. You can just pick colors willy nilly, but in the end, you will be at a loss when you begin stitching.
Here is how you add some method to the madness.
Choose 3 pinks- Choose the main flower color and 3-5 coordinating colors; one darker, one lighter, one warmer and one cooler shade.
Then repeat the same for your yellows, reds, greens, purples and blues.
Coordinating colors are often together on the rack. You can find floss in any sewing or craft store.
Don't forget to add ecru, white, brown and black. You just never know when you are going to need them.


Here are the 8 flowers we will be creating in this tutorial.
Chrysanthemum (Mum)
Daisy
Sunflower
Lavender
Hydrangea
Geranium
Coneflower
Rose

Of all the flowers in the world, you have to list only 6 for the flowers you would like on your pincushion. You will find that many of the flowers I will teach you can be adjusted slightly to create an alternate flower. For instance, a simple daisy can easily be transformed into a sunflower, a dahlia, or a Gerbera daisy. The above pincushion has a few other flowers such as a Forget Me Not, Queen Anne's Lace and a few fantasy flowers. I've also stitched roses, mums, coneflowers, hydrangeas and sunflowers. The pincushion on the very top of this post has hollyhocks and a pink delphiniums.
Don't be afraid to play!

Tools and Materials


You Will Need-
Fabric, preferably linen or a linen blend in ecru or a natural off-white color. A fat quarter or a quarter of a yard will give you plenty of fabric for practice and for pincushions.
Embroidery Needles
Embroidery Floss in many colors (See color list for each flower).
Perle Cotton in Off White or Ecru in Size 5 (to tie off sections later)
Polyester Fiberfill
Sharp, small scissors
A long soft sculpture needle (to tie off each section)
A sharp sewing needle to close up your pincushion
A disappearing or water soluble marking pen or a friction pen
Pencil
Paper
A Pattern (Use Template or draft your own with a protractor)

Optional:
Jeweler's pliers, needle nose with a smooth jaw.
Emery enclosed in muslin (See my Emery Post)
A Needle Threader
A scrap of muslin to practice your stitching on. Great to have if you are a beginner.


Step One
Template Click to download JPG.
The PDF file is here. (Why don't you print two copies) Use one for sketching ideas and one for your pattern.

If you cannot print the template, you can draft your own.
On a piece of paper draw a circle 6" in diameter, (across).
Using a protractor, divide your circle into 6 equal sections. Each section is a 60 degree slice of the circle. (Think of it as a fabric pie.)
From the center out, mark you sections on your pattern. (See Template) You don't have to draft your own pattern if you downloaded a the template. But I recommend you try your hand out at drafting patterns. Once you gain confidence you can design just about any pattern you want.


Step Two
Loosely sketch your flowers onto a piece of scrap paper first until you find a pleasing arrangement. Your flower should sit inside one section. Be sure to leave a 1/4" seam allowance around the outer perimeter. You may also want to leave 1/8" space around the section lines.

As you design, deep in mind what color each flower will be. You want to mix your flower colors up. For example, one flower could be red, one yellow, one white, one blue, one orange and one purple. (See the examples above).

Keep your flowers rather simple at first. Each line with eventually be a strand or two of floss. Tiny lines mean tiny stitches. Because our pincushion is on the small side, you wont have room to get into very involved embroidery. If you are a beginner, complex designs can seem overwhelming.
Don't let me scare you. This is really a fun project. I promise! This is a great project for someone who is new at embroidery because nature is imperfect, you can be imperfect too!
Just keep your sketches simple. Once we start stitching, I will show you how to transform shapes and lines into stitches.


Step Three
Using a light table or a window, trace your pattern onto your linen.
Then cut your circle out of your linen. Be sure to allow for least an inch all the way around your pattern.

Then trace your sections with an erasable water soluble or friction pen.

Next, make a dot in the middle. This is where your button will go later, so its nice if the center mark stays there until the very end. This dot will be covered so use a pencil just for this one mark.

Then mark your seam allowance with an erasable water soluble or friction pen. This mark should go around the outer circle to mark your seam allowance. I have this area highlighted on the template. (I once embroidered into the seam allowance. I don't want to do that again!)

Whew! That was a lot of information but we are past the prep step.

Next we will be transferring your pattern to your linen.

Then we will start stitching! Oh Joy! I promise, you will love this project once we get started.
See you soon!