

Ta da! My newest apple on Fiberluscious.
I had just planned on making a PDF pattern for my pear pattern, which I will, I promise. But I got to thinking about originality and how we all love to leave our own mark on this world. Thats such an important part of creating. Its a desire we all share.
I can't say my designs are completely original. They may begin with a simple pattern of which I can't seem to copy without changing its shape, size and dimension. Here are a few of my favorite patterns-

If you are a seller of your work its very important to draft your own patterns. Most designers will ask that you only use their patterns for personal use. Creating a pattern really is a challenging and rewarding experience. It frees you to sell your pieces without stepping on another artist's copyright. Although flattery is a compliment, it also really ticks some artists off, to the point that they deny Pinterest Pinning and occasionally post horrible things about you on their blogs or forums. I usually don't get upset. No two people ever do the same thing the same way. I just ask that you don't get rich on my designs with at least not giving me a bit of credit for your inspiration.
For those of you who want to do this, but can't quite find the time and feel exhausted just wondering how one would go about such an adventure, let me guide you through it.
I promise you a complete sense of satisfaction and pride when you apply this to your creating. The challenge is all just one step in the journey. So lets go!
Here are a few tools that may come in handy for this and other patterns.

Paper. I use grid paper for many of my patterns. It helps me to keep things symtrical. However, you can use scrap paper, newspaper, kraft paper or cardboard.
A soft measuring tape, a ruler, a protractor, a compass and an eraser. I suggest you create a prototype. For that you will need muslin, fiberfill, a sewing machine, needle and thread. It is very helpful to have a model or something close to the size of your finished project is optional so you can gauge the approximage size of your final pattern. A calculator is also necessary.
Step One-
Make your measurements. Begin with an object close to the size and shape of your desired pattern. I know its not fair that I am using a finished apple to show you the measurements, but stay with me. I'll make it clear how you can begin with simple ball shapes, such as the silver ornament above.

Here is an illustration showing you how these measurements become the foundation for a very simple shape. Note, you can easily flip this diagram upside down and create a pear pattern... and you thought that this was going to be hard.

Here is how to draft your pattern onto paper. Begin by recording all measurements. I am writing mine on the top upper corner of my pattern paper.
Then draw a line showing the height of your desired pattern. If you are beginning with a simple round shape, simply extend the tape measure up past the top of the ball and inch or two. Round the measuring tape off on top to simulate the curve of the 3-D object. (Its better to over estimate this measurement than under estimate it.)
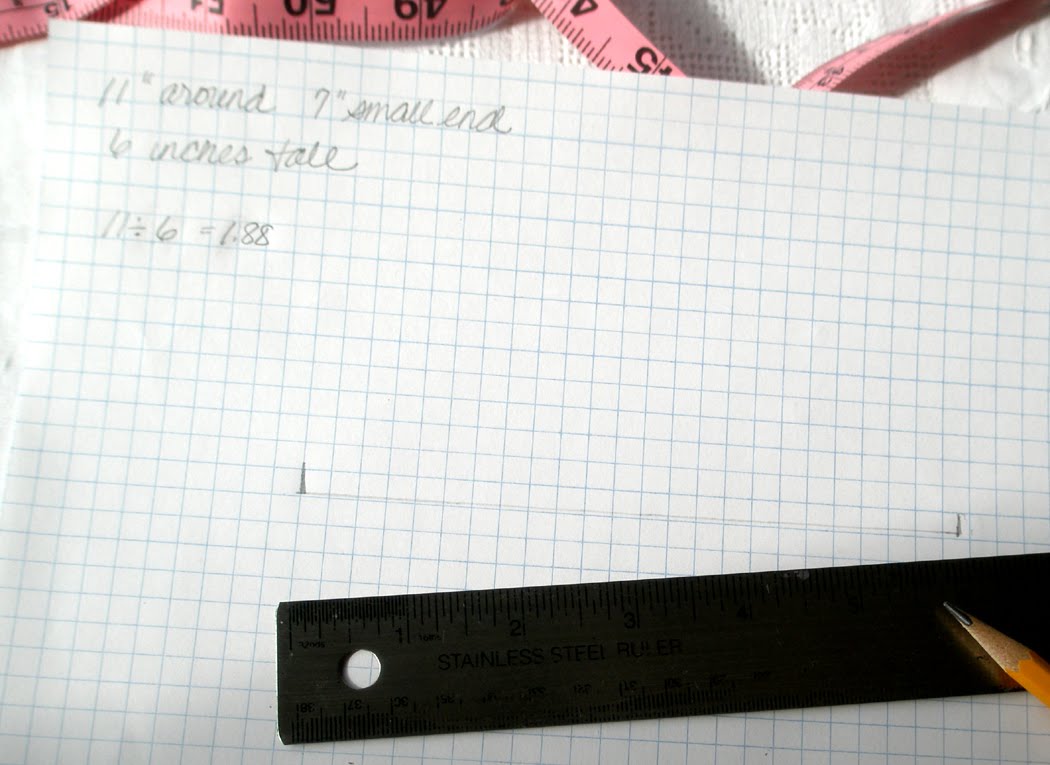
Now you need to come up with your width measurements. Sorry, you will be needing a bit of math here, but it's not hard and you don't have to be exact.

Next add your 2 width measurements. Extend how big those areas should be.

Now its time to create a shape. Each end needs to come to a gradual point. The curve should be rather drastic. If the curve is long and gentle, you will create a pointed end. Not a great shape if you want your pincushion to sit straight up. It would just tip over. however, you may want that kind of a curve for the top of a bosc pear top.

You will need to join the two sections in the middle. You can curve that line in and make it shapely. If that line is straight from one section to the other, your final shape will look kind of squatty. Do what ever you like the best. Your the boss!

Now add a seam allowance all the way around your pattern shape. I usually use an approximate 1/4" allowance. This is one time that you don't have to be a perfectionist. Do what is comfortable. Just do it the same way each time for each section.

Once you think you have your pattern, I suggest that you create a muslin prototype. This is so worth the time. You don't want to use your favorite fabric only to find that your shape is not at all as you imagined.
Use muslin and cut 6 sections.
When I created my muslin prototype I realized that I wasn't too fond of the shape. I was close, but it just was off. Here is a photo of the final muslin shape, the original pattern draft and the final pattern piece.

Just a note. When adjusting your pattern, do it in small increments. Eveyr change will be multiplied by 6. A 1/4 inch change will create a 1 1/2 inch total different in the final piece. How can you determine just the right change? Why don't you pin little tucks or let out a few seams in your muslin piece. I often don't sew it completely shut, so I can remove the stuffing and make my changes on the original instead of having to resew a new muslin piece for each change.
Save your muslin piece. It makes a great tool for your embellishement design.

Here are some different versions of my pear pattern.
Just a few small changes in the pattern shape can make a big differnce in the final piece.
Here is my very first pear.

For this pear, I elongated the pattern. The top is longer and more drawn out than my first pear.

Just a note, using different fabrics can change the final shape of your pattern. These 2 apples are from the exact pattern. The pieced patchwork caused everything to be tighter and look smaller.
The original pattern is bigger and plumper. I love both of these apples


Experiment. Have fun. Once you have the outsides figured out, embellishment is next....oh the creative process just never ends.
9 comments:
Wow, that is a great tutorial! I just love your work! It's just gorgeous. And you are so sweet to share with everyone! Thanks so much!
Cheery wave from
Bev
Love Love Love your apple, Jill. I am crazy about pincushions in general and your work is beautiful!
Thank you so very much ladies! You are so sweet for stopping by and your words made my day!
Jill, your work is absolutely beautiful...little works of 'heart'..thank you for sharing...I'm now a follower and can't wait to see more!!! :o)
Thanks Terry. I am one of your new followers too!
I just happened across this wonderful tutorial. Thank you so much for sharing.
I am a new follower!!
Stunning needlework & sewing! Just dropped by to say happy November!Hope this finds you well. Visiting from DearCreatives.com
Fabulous....i love what y ou do..
Thanks for sharing
Hi from france
Absolutely adore your work, you are a fabulous artist! Thank you for sharing.
Post a Comment