Thursday, July 17, 2014

Embroidery Floss Basics


I'm going to be creating a tutorial for my Summer Garden Pincushion very soon. I have a few orders in my shop which has delayed my efforts, but I hope get this posted for you very soon. Below is my 8 section Summer Garden Pincushion on Linen. I'll be posting a tutorial for a 6 section. If you do a few flowers a month, you should be able to give your pincushion away for Christmas! We'll work on a specific flowers and stitches each month. Just a few stitches can be transformed into multiple flowers. The tutorial is free for all. If you would rather work from a pattern, it will be for sale in my Etsy shop in August. The free tutorial will have all the instructions. You should have no problem designing your own flower pattern.
Well, more to come on all of that.


I'm going to walk you through your trip to the craft store to pick out your embroidery floss colors, needles and linen. Once you have all of these materials ready to go we can get started!

I use DMC floss and I suggest you do too. I would not recommend using a budget brand of embroidery floss. You will find that it knots up more often. The colors may be bright, but they may fade much sooner than a quality thread. If you are going to invest a lot of time into your work, you want it to last, and you don't want to spend more time fighting your threads than you do stitching your stitches. When each hank of floss is less than 40 cents each, why not splurge!

How to Choose your Colors
I also recommend that you have a series of warm and cool colors in each color. This will allow you to pull some flowers forward and push some back. I'll explain those color concepts as we create our flowers. Here is a little illustration of what I mean by warm and cool. Warm colors have more yellow added and cool colors go more to the blue side. You can see that these colors also go from lighter shades to darker shades. Light colors have more white added, while darker shades have more black in them. When you see a color on the DMC display in the store, they really have no rhyme or reason on the shelves except for the little groupings of each color as they became available for sale. Most colors are grouped by shade, lightest to darkest, but not every color is that organized.


Here is a Revised Embroidery Floss Basic Color List to take to the store. Its my recommended list of colors for any type of flower or nature embroidery. I've add a few tips and tricks from this post all on a handy PDF you can print and take to the store. What store? Embroidery floss can be found at just about every fabric and craft store. I order some of my colors on-line. A word to the wise. If you stick to the local store in town, getting more is easy. There is nothing worse than running out of a color in the middle of a project. Groan!
Don't be afraid to pick up extra colors or make substitutions. I always believe in putting yourself into everything you do!

I guess I'm giving you permission to go crazy and buy lots of floss! Yes, tell your hubby that I said you need that big pile of embroidery floss. At about 40 cents a skein, why not?!


Here is how you add some method to your shopping madness.
Choose 3 pinks- Choose the main flower color and 3-5 coordinating colors; one darker, one lighter, one warmer and one cooler shade.
Then repeat the same for your yellows, reds, greens, purples and blues.

Don't forget to add ecru, white, brown and black. You just never know when you are going to need them.
You can add some various shades of black from pale gray to near black. Those also have warm and cool shades, but I wouldn't worry about it as much in the beginning, just add a few for now. As you build your stash, you will figure out what you like and what works.

I also love the variegated colors. They are sometimes hard to find in the store, but they make stitching grasses, leaves and petals fun. The color changes gradually as you stitch. Here are my favorites. (I photographed Perle Cotton skeins as well. It may be a bit easier to see the color changes.

I should note that there are 558 of floss colors! It can make you crazy!
Some colors have an unnatural feel to them. They may have a neon glow or even glow in the dark! Avoid those for right now.
Below you can see a few different oranges, pinks and blues. One is better for flower work than the other.
I chose a strange color and then a more natural choice. I'm not saying that you shouldn't buy those great colors. They just may not work for this particular project.

Here are some tips from my Managing your Threads page. You can find more information there, including more details about Perle Cotton.

6 Strand DMC Embroidery Floss is my go-to embroidery thread. It has 6 separate strands which can be pulled apart for your desired thickness.
Floss comes in 8.7 yard skeins in 454 colors.
It is the perfect choice when doing tiny work with lots of detail. Most crazy quilt designs are embroidered with single or 2 strands. I use 3 strands when I want a good filler or a thicker line. I also use one strand for tiny details. However, 2 strands will give you an elegant look.

When I bring my floss home I put each color on a bobbin right away. If I buy duplicate colors I put those in a box. If you just put them in a big pile and handle them often, you will find they are harder to manage later. Kinks promote knots. Loose ends mate with other loose ends and that creates messes.

Bobbins keep my stash tidy and bobbins fit into most organizers nicely. Its great to see all your colors in a glance.

DMC sells plastic bobbins. Any brand will work.


Unwrap the label from your floss. Make note of the color number on your bobbin. DMC offers bobbin color number stickers for easy labeling.

Carefully split the skein into a loop.


Place the loop of floss over your hand so the loop spins and the skein easily unwinds.
Begin winding the floss onto the bobbin. As you pull the thread it will spin around on your wrist and easily unwind without tangling. If it catches up on itself, slow down and unwind it by hand for a bit until it starts to spin on your wrist again.


When you are done, keep them clean and organized in a box. I found mine for 99 cents.
Everything in its place...


I have a confession. My boxes do not look like this. I used this photo from Junie Moons blog.

A few more tips...
I usually pull my go-to colors for each project and put them on a paper plate. I keep my needles, a spare pair of readers and my scissors there too. When I am ready to stitch or when its time to stop, I can move the whole thing around where needed and my madness is contained.
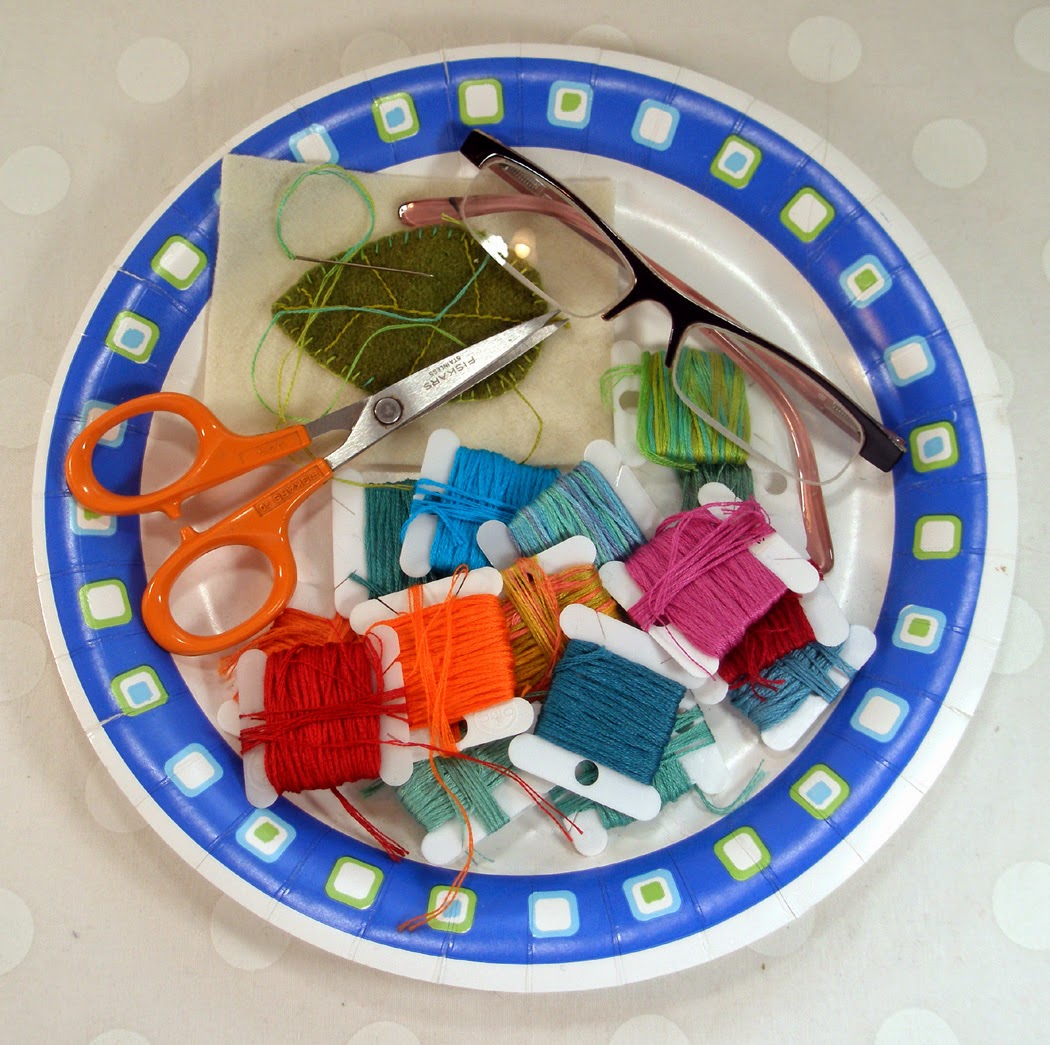

When I get ready to stitch I unwind my floss from its bobbin, I cut each length 12-15 inches long. If you use very long threads, you will have to deal with knots. If you choose a short length, you will be cutting and splitting more often.
Floss comes in 6 strand hanks. You will need 2-3 strands for stitching.

How do you pull those strands without a tangled mess?
Begin by smoothing your cut strands between your fingers. Pull gently from one end to the next 2 or 3 times.
Then start pulling individual threads from the middle of the strand. Pull the strands apart until you have the number you desire. Work your fingers between the main strands and the one's you need and pull them apart slowly. Try to keep the ends from tangling up on each other as you pull.

When ever you find things knotting up, stop! Slow down. Be patient. Its much easier to undo knots when they are loose.

I usually put the other strands back on the bobbin. Just wind them in the opposite direction of the main floss and be sure to tuck those ends in. Your box will soon become a birds nest of a mess if you just let those strands fly around on their own. They like to play when you aren't looking. Before you know it, you will have a real mess on your hands. Its best to make a good practice of organizing as you work. You'll thank me for that advice later.


When you are stitching you may have leftover threads on your needle. Unless you have nearly a whole length leftover, I recommend that you throw away the rest of the floss. As you pull the floss through your fabric it wears down the fibers. You will find that as you get near the end of a length, it gets easier to stitch. The floss is actually getting thinner. I find that the last bits are too thin to give me a good, solid line and certainly too thin to fill in a space. Floss is so inexpensive. Don't work with scraps if you don't have to.

While you are at the fabric store, why don't you pick up some needles and linen right away?
I'll try to explain a bit about needle types. But. why not pick up a few kinds and see which one you like best?
Needles

Chenille (2) and Embroidery (3) needles have a sharp point. When working with tightly woven fabrics, like quilting or batik cotton these are a must. They are also great for fine fabrics such as organza and silk. They will glide smoothly through the fabrics without making noticeable holes in the fabric.

Tapestry (1) needles have a blunt or round point. They work well on linen, wool or aida cloth or any loosely woven fabric.

The larger the number, the smaller the needle. My favorite needle is a size 26 Tapestry. Its sharp enough to piece most fabrics, but not so sharp that it pokes my fingers when I bring the needle to the back side of my work.

I've also included a Soft Sculpture (4) or Upholstery needle for this project. Its very long and has a nice size hole large enough for perle cotton. You will need this needle later when adding the sections to your pincushion and for adding the buttons.

Last but not least, you will need a regular sharp needle. I often use a fine applique needle (5). This is used to close up the opening in your pincushion after you add the stuffing. A fine needle makes is easy to create a nearly invisible mattress seam to your work.

Linen
You will need linen as your main pincushion fabric. Its a lovely fabric for embroidery. It has a nice, regular weave. Floss glides smoothly through linen with each stitch. It comes in a variety of colors including many shades of cream, white and ecru. Find a medium weight linen. If it is too thin, you will be able to see through to the back. If it is too heavy, its harder to get fine details.
The weave should be regular and not too nubby. Knots and nubs will get in the way of your design.
I have photographed the linen colors I keep on hand. I use the middle color for this pincushion.


I have used the dark green and a bright red for some projects. Color fastness is a real issue with colors. Presoak your colored linen in vinegar to help set the dye. Then prewash it in a warm wash with soap and put it in the dryer to also set the color. I prewash and dry all of my linen. Remove it from the dryer immediately to help reduce wrinkles. I also iron my fabric just prior to stitching on it.

You will need to block your embroidery design after it is stitched. I find that prewashing and drying the linen first, makes blocking more predictable. You won't have to worry about shrinkage. After hours and hours of stitching, it would be so sad to have your linen shrivel up under the strain of the embroidery.

If you have any questions, please leave them below. You may also contact me through my Etsy shop.


Have fun on your shopping spree!

Next, we'll go over the tools and remaining materials you will need for your pincushion.


Friday, July 11, 2014

Play Time!

I know I said that my next post would be a stitch lesson. Sorry!

Its just that I have had some play time and I just wanted to share my most favorite pincushion. I say they all are but this is my new favorite.

I used all vintage fabrics in it. I had ordered some beautiful feedsack pieces from Etsy along with a group of vintage cottons in assorted prints. I also found some beautiful hand quilted blocks in a soft pink and black and white print. They feel like soft rose petals. The colors have this lovely faded patina. The prints are fun, a bit bold and some just plain homey. I treasure these fabrics, but I promised myself I would not allow them to collect dust.

Isn't it just so hard to cut into some fabrics? Well, I recommend that you just dive in. The water is warm and playtime is fun!

Because I only have a few dozen I mixed and matched colors and prints I probably wouldn't have I had more. In fact, I had been pondering what to make of the green print with the bold black and white fabrics. How wonderful is that?!
It made a great framing color and the sturdiness of the fabric made a great back. I think it was from a table cloth or home dec fabric.


My favorite part is the embroidery. You know, its been so very long since I have had the time to do something new. I think that each design I find time for is going to just explode from my heart, like this one did. The bird is a purple finch. I have a flock of them nesting near my bird feeders. This is the male. The female is speckled in many shades of brown, like a cup of coffee as you stir in your cream.

I love how proud he sits on his perch. I try to do a few sketches while they eat. I have eighteen different birds coming to eat at my pine tree diner. I adore them all. Its so relaxing to hear them sing and call to each other.

Well, I just wanted to share this one with you. It sold 30 minutes after I listed it, so it wasn't around long. It did go to one of my dearest customers. She is giving it to a friend, which makes me so happy. I almost kept this one for myself. It was hard to let it go, but it went to a very good home so that makes me feel better.

I have more fabric left from my vintage collection. I also have about 30 new fabrics to show you! I have them photo graphed, but not processes so it may be a bit. I have a back log of orders to work on again. Oh my. Play time is so precious. I will try to sneak in some new things soon. In the meantime, I have some tutorials to prepare for my next post!

Well, I hope your summer is warm and fun and you are finding time to play. If you can't find it, make it! You never know what you will discover!

Tuesday, June 10, 2014

Take a Tomato and Make it Yours!

My favorite go-to pattern is my tomato. I found a template on line and I did a few muslin versions, tweeking it here and there until I had a shape I liked. It has become my most popular pattern. Its fun to make, and very addicting. With a few design changes, it can become just about anything you need to to be.

Here is the first one I made. I used 1930's fabrics and topped it off with a fun, frayed leaf. Add a few buttons on the top and bottom and .....


I've made it in silk, in Civil War prints, Modern fabrics, and then added a bunch of new design elements.
Check out my Gallery Page to see more.

Here are some of my latest versions.
I fussy cut a cute bird print fabric and matched a mix of prints with it.


Here it is again in a modern print mix. A big bold ceramic button tops it off and becomes a focal point.


You can find these and more in my Etsy Shop- Fiberluscious.

I've done the same thing with my Classic Pattern. You can find the tutorial here.
Here it is with just a button-

Here it is with tied sections-


I took that design a step further and added an applique top, without tied sections.
A few bits of lace trim and it turns into a real charmer!


I went even further and added another layer!
This time I tied both layers. I had a frilly crocheted vintage doily and this is what I got!


I hope you decide to take some time to play. Grand ideas often begin with simple elements and great fabrics.
Give the Classic a try. Its fun, easy and only takes a bit of fabric, some fun buttons, perhaps some perle cotton and your imagination!

If you are as busy as I am, don't forget to check out my Etsy Shop. Let me make one for you!
I am very open to your ideas.
My Fabric Choices Page may give you a jumping off point in designing your own pincushion. I've put some coordination fabrics in bunches for you to make it a bit easier to decide. I have lots of buttons, new and vintage and some fun trims and vintage pieces to add.
Let me know what you like and lets go!

I also have a Gift Certificate for my Tomato Pincushion. Its a great gift for someone you know who has a lot of ideas and little time. I promise, I'll treat them like a design diva when we work together. Its a gift they will not soon forget, and use every day!

I have some great posts coming soon!
I am currently working on a pattern for my Summer Garden Pincushion.
Yes, the one with all the beautiful embroidered flowers on linen.


I get more orders during the holidays than I can keep up with, so I'm giving you the pattern and an ongoing tutorial series so you can create your own.
I will give you a new flower each month. I have a lot of flower patterns but I've changed the pattern to include only 6 flowers. You can pick and choose from a number of flower designs for your pincushion. Make one, make many!
If you don't want to follow along, the pattern and instruction will be available in a kit and available in my Etsy Shop- I'm guessing sometime in August.

My next post will feature a few pointers to help you prepare. I'll walk you through some floss shopping. With hundreds of DMC colors to choose from, its so easy to get lost. Then when you sit down to stitch, you find you simply don't have the colors you need to complete a project. I'll give you some pointers. You can choose my list of colors or just follow my pointers for choosing colors that work. Its going to be fun. I promise.

If you want to get started, I have a few Stitch Tutorials. There are just a few basic stitches that will take you far. I also recommend NeedlenThread. Mary Corbet has so many great picture and video tutorials for you to try. Just click here.
I have learned most everything I know on this site. I also belong to the
Hand Embroidery Network. A free site for embroiderers.

I'll walk you through the tools you'll need to embroider. Its a very affordable craft. Your time is the most valuable ingredient. You may be surprised at how fast things go from beginning to end once you start. You will also find that it is a very "Zen-like" experience. It sure keeps me sane.
As soon as I get my pattern drafted, I'll post it along with the first set of stitches you'll need to learn and how to turn them into beautiful flowers and leaves. We will take it step by step. You may find that 3 basic stitches create multiple flowers. I'll show you how.
Stay tuned!

Wednesday, May 14, 2014

Springtime Giveaway Heaven

I am participating in an amazing giveaway at 2 Bags Full. It is hosted by Vicki, one of the most talented, creative and generous bloggers, no, people I know. And I know a lot of talented, wonderful, generous people! This give away is to celebrate spring and she is doing it right!

So why are you reading about it here...well, you can win one of my Garden of Delight Needle Book there, custom designed just for you!
(Photo by Vicki Boster)

I created the above needle book just for Vicki. Actually, she purchased 2 and waited forever while I stitched them up, and down and all around. I had loads of fun creating for her because she is so open to unique creations.
Here are a few more in different styles and colors.

These needle cases are one of my favorites to create because each one is a reflection of the person who is ordering. No two are alike. You will be able to help me design your needle book to your specifications. You can request specific flowers, birds or any other imagery that is meaningful to you. I'll give you more details before we begin.

If you are interested in ordering one, I'm afraid that I am not taking orders at this time. However, your request can be added to my waiting list. I am hoping to get back to this design in late June. In the meantime, take a look at my Etsy Shop. I have so many pretty pincushions and needle books to entice and hopefully inspire you.

Well.... lets get back to Vicki's Giveaway.
She is featuring her Spring Woodland Nest. Oh my, it is just so beautiful!
(Photo by Vicki Booster)
Isn't it just so amazing? Well, if you visit her blog, you will see how many wonderful things go into each and every one of her nests. She only creates a limited number each year. They are true labors of love. Well, you can find out more when you get to her blog.

When you purchase her items she nearly always has a charity donation connected to her sales and this one is no exception. She is working with Lily's Place, which is a pediatric addiction recovery center in Kentucky, where she lives.
She organizes her Pink Scarf Project each October to raise funds and awareness for Breast Cancer.
She also hosts and organizes the Grow Your Blog Party to help up and coming artists/bloggers find each other and find followers. So many artists have been found and have connected because Vicki remembered what it was like to have something to share. All they needed was for people to find them. Vicki helps!

Well, you can also find some amazing things in the 2 Bags Full Spring Give Away.
Vicki's Springtime Woodland Nest
A Necklace by Sidney from How My Heart Beats. It comes in a sweet fabric gift bag. Too adorable!
An Anthropologie Inspired Bag by Margaret Smith Gardiner
A Mini Book of Garden Verses by Sue Kosec
Vicki's friend Marsha has also painted a lovely Tea Set and Nest Tags.
My dear friend Cynthia Crane has donated a delightful Pitcher, Bird inspired ceramic buttons and painted notecards. Wow~!
You can find images of these beautiful items, along with artist links and contact information to find out how to order some of the items you see. Just in case you just can't wait for the Giveaway to end, which is on June 21st. The first day of the Summer Solstice.


If you are here from Vicki's Giveaway "Welcome!!!". I'm so glad to have you here.


I'll be hosting my own Giveaway in July to celebrate Pinterest. Homespun Magazine, in Australia will be featuring one of my needle cases, The 1930's Flying Geese Design in their August Issue.
You can find me in their Best Of Pinterest Feature. I'm thrilled. I'll be giving away 2 sets of Stick With Me Pin Assortments to 2 lucky entries. Don't sign up now. It won't count.

Thanks for stopping by and "The Best of Luck to You!" Whomever wins that price is one very lucky person. (Wish it could be me).

Saturday, May 10, 2014

Happy Mother's Day!


To all of you amazing mothers, grandmothers, step-mothers, mother-in-laws and gentle caregivers of the world .....


Abraham Lincoln once said, All I am or hope to be, I owe to my mother.

I doubt we understand the full scope of what being a mother means to the world. Its too easy to get caught up in all the little trials and challenges to see how important we are and how well we do. The world is complex and its easy to get overwhelmed and fall short of our ideals. What I notice when I see my mom and feel her soft hand, hold mine is that she is the beginning of everything good in my life and her love flows over me each and ever day. How amazing is that? She is much too humble to realize how important she really is.

Without her, there would not be a me. I would not have my amazing children, wonderful family or my beautiful grand child. She taught me love. She taught me gentleness, compassion and the importance of doing my best, even when its hard to even try. She told me I was important. She kissed my boo boos and soothed my heart aches. She taught me so many lovely things. She is the reason I love my life so much.

I will never know if I am as great of a mom as my mother. I am still working at it. If I were judged by how amazing my children are and how much I adore them, I would have to say I'm doing pretty well. They are filled with love. They share it with their families and my mom's love flows through me and into them. Its a pretty strong love.

I wish I could tell my daughter-in-law that she is amazing in such a way that she would feel it to her bones. Because she is stunning as a mom. I see it in how beautiful my grand daughter is and how, at 3, she feels happy in her life. Love flows from her.


I hope that today you see the full scope of your motherhood and what it means to the world. Our children all play together on this planet and so far, we seem to be doing pretty well. The world keeps turning and love keeps flowing.

So find some time to take in those glorious hugs and kisses. Put your feet up and have a quite cup of tea. Make that big dinner or better yet, let someone else do it for you. Think hard about the wonderfulness that flows from you. Think of all the people who would not be here if not for you. I'm sure you will be amazed by what you have done and how well you have done it.

Have the happiest mother's day ever!

Tuesday, April 22, 2014

Frilly Star Doily Pincushion Tutorial


Have a vintage doily in your stash? Lets make a special pincushion!
It doesn't matter what size it is...it can be any shape!
Using this technique, you can create a professional looking pincushion pattern.
Make a pincushion for yourself or give one as a gift for your favorite stitcher.
Lets dive right in...

The Pattern Making Tools
Doily
Pencil
Paper
small ruler

Pincushion Materials
Friction or Water soluble Marker
Thread (Matching the doily colors)
Needles Sewing Sharp & Soft Sculpture (2" long)
White Fabric or Fabric that sets off your doily (for under doily on top)
Backing Fabric (yellow dots for mine) for the bottom of your pincushion.
Polyester Fiberfill
2 Buttons (decorative one for the top, plain for the back)
Heavy Thread. I use perle cotton size 5.

Optional- I used a frilly doily shape to add a fun topper to my pincushion.

Step One- Trace around the doily onto plain paper. Be sure to mark the center point on your doily.
If you just went on from here to make your pincushion, it would probably be fine. But you may be disappointed in how wonky your points are. You also may have problems lining up your top and back fabric pieces.
This next step will give you a wonderful pattern that you can use for many other things. It will also fit great when you add your doily to the top. Its worth the extra effort.


1. Measure the point from the center of the doily out to the peaks and valleys. (the lines you traced in the previous step).
2. I measured just inside the doily outline for my first measurement. Ithen added 1/4 inch out. This will give me a comfortable seam allowance.

You may notice that the original line will sometimes be smaller or larger than your first markings. Don't fret. Doilies stretch a bit. Its easier to stretch a doily than it is to stretch cotton fabric.

Once you have your pattern measured, draw a line to connect your outer dots.
Cut along that line. This is your pattern!
I have no idea why I did not photograph the next stage. its one you have done many times.
I am using my classic tutorial to show you how I cut out my pattern, sew it, turn it and stuff it.


Next I sew the opening of the foundation together. I use a mattress stitch. It is nearly invisible when you take tiny stitches.


Once I have the foundation finished, I placed the doily on top. Just stretch it here and there till it fits perfectly.
Sew the doily onto the foundation using small stitches. Use a matching or an invisible thread.


I then threaded perle cotton through the back of the pincushion to the front and back a few times.
Then I added the frilly little doily to the top, added a button, came back down through the doily and then added the button to the back.


To finish off, tie a know around the bottom button. I may do this a few times to be sure all my knots are secure. Then just cut off any excess thread and you are finished!


Here are a few doily pincushions I made in other shapes-
This is a simple square doily on felted wool. I used needle felting on the wool to give it an ombre look. A little felt ball takes the place of the top button.

These doilies use a simple round pattern. The background fabric is linen.

I love how doilies work on wool. They seem to hold onto each other, making placement a breeze. This beautiful doily looks so pretty on soft gray.


I hope you try this technique. It works for many oddly shaped patterns.
Vintage doilies are treasures from the past. Perhaps they graced the arm of her favorite chair. Maybe they adorned an end table. They all were lovingly hand crocheted by someone who really cared to take the time to create something amazing. It is a special honor to find one of these handmade wonders. I can almost feel the happiness of their original makers, knowing that their creation has been taken out of the attic and given new life.

Its worth the extra time it takes to make your pincushion even and uniform. I hope this tutorial gives you the confidence to take on any shape.
All of my pincushions include an emery pocket which is hidden inside. This adds the a a great pin cleaning and sharpening element to my cushions. Go to my tutorial page to see how I do that. Emery makes your pincushion heavier than most and helps them to stay put on your work surface.


Happy Sewing!


Wednesday, April 2, 2014

Sassy, Springy Pincushions inspired by thoughts of Springtime.


Hi all! I just noticed my last post talked about cold and snow. Gosh its been such a long winter. We are just not getting some warmer days. Its spring on the calender, but Wisconsin weather kind of does its own thing. I will take each day of warmth and sunshine as a gift to cherish. Like my newest little house, I'm happy to snuggle up in my studio to work.

Its been so crazy this year. In past years, I had a nice long lull to recouperate from a long and busy holiday season of sewing and stitching. This year it just keeps getting busier! I had hoped to take a creative vacation last month but it never slowed down long enough to be able to relax and enjoy any kind of break. So, it looks like that rest will have to wait for later this April or maybe May. All I really wanted was to have some time to work on new projects. Since I can't find the time, I decided to make it! A day of play only adds fuel to the creative fire. When I stop loving what I do, it will be time for a very long break. In the meantime, my fingers are still flying!

Here are 2 pincushions I just finished. I think my brain has been wanting to play for so long, it only needed permission to come up with something fresh to share with you all. I put some new fabrics on my work table, grabbed my little frilly things, vintage flowers and a few tools and before I knew it, I had these pretty pincushions finished!
Here is a feminine little cutie made from a sweet blue rose print I recently found-


I didn't want it to be too "matchy matchy". I wanted to keep the design simple and fresh. I used my classic pincushion pattern as a basis for both of my new designs. You can find a tutorial here- http://fiberluscious.blogspot.com/p/classic-pincushion.html. Why not try one of your own! Its really easy peasy!

This next design kind of exploded out of me! I found adorable lacey vintage mini-doilies on Etsy at SimplyStephy. The fabric was the true inspiration. It just sang a song of spring. I decided to put the emery on a mini pincushion which sits on top of the main classic foundation. I used perle cotton to separate each section. I added some fun pins and before I knew it, I had a new pincushion to add to my Etsy shop- Fiberluscious.


I also have been working hard on many orders. I've met some great new people who have injected a dose of enthusiasm in my work. They have so many ideas for future pincushions. I wish I had a second set of hands to keep up with their wonderful ideas. There are so many!
Let me show you a few of the items I've been working on. A few are recreations of past designs. I'd like to think that each project has a unique twist. I think everyone deserves an original!

A little crazy quilt tribute to our favorite feathered friends-

I saw my first robin last week. It just has to be spring now!

Here is a Garden of Delight wool needle case. I have a few more just about ready to ship. I love creating this one!


I am not sure if I ever shared this pincushion with you. It came together using some lovely vintage feedsack fabrics and some cute embroidery designs.


Well, back to work for me! My grand daughter is due tomorrow so I have lots to do on my sewing day.
Hope you are feeling inspired and ready to work on your own creations. There are so many fun things to do and just so little time!