Sunday, November 4, 2012

Check out these Sweet Pear Tutorials

Here are some amazing tutorials. I'm going to spread the love here because my method is so similar to these artists, yet, each one of us has something wonderful to bring to the same pattern.


The 1st is from PositivelySplendid.Com
It is such a beautiful tutorial with lots of pictures to guide you from start to finish. I know its a pumpkin, when we are thinking pears, but the pattern and construction are very close and I really wanted you to see her work.
Amy is so talented and she has an incredible variety of tutorials from t-shirts and pillows to a whimsical, colorful Christmas stocking- all stunning, original and drool worthy. Take a look!

Here is a sweet tutorial from April Moffatt Design. Simple and sweet.
April has some beautiful home dec tutorials you will want to try. She even has a cake decorating tutorial! Outstanding and very original. Many of her projects, such as her lovely ring bearer's pillow has been featured on the cover of Crafts N' Things! She has also contributed to other Crafts N' Things and Stitch Magazines. She has a lovely site and blog and some adorable tutorials. Stop on by and check out her tutorial here.


Its a small world. Here is a pear pincushion from Queensland! There is something so universal about our love of fabric and the joy of creating! Susanna creates for kids and she has a little legging tutorial that is so cute.
Here is a quick pear tutorial on Handmade in Bikkurim's Pear Tutorial

She swears it takes only 20-30 minutes although it's hard to believe you can get that much cuteness out of less than an hours work. Wish I could simplify every once in a while!
Take a look at her Etsy Shop and see what she has for your little one!


One of my very favorite finds is RetroMama by Kim. You can find her work here- in her Etsy Shop. and her Her Blog-


Patterns are great when you just want to share your love of creating with someone else. Send them one of her kits here!

Check out her Etsy Shop and see more of her totally sweet patterns and products!
Her sweet fabric house ornaments were featured in the "Make It" issue of Better Homes and Gardens. I emailed her to tell her how much I enjoyed the article and how much I love her shop and she graciously responded with encouragement. You know... artists are just the nicest people.
Kim has designed sweet softies, buntings, tea cozies and so much more. She also carries a line of brilliant felts in her shop so you can create some of her patterns with some of the same high quality materials she uses.

Now for my tutorial. It's about time, don't your think! I hope you give it a try! I encourage you to take any pattern you find and make it your own. No one sews, no one imagines, no one chooses fabrics just like you. Add your own style and go for it!


Saturday, October 20, 2012

How to make a Pattern for an Apple Pincushion


Ta da! My newest apple on Fiberluscious.

I had just planned on making a PDF pattern for my pear pattern, which I will, I promise. But I got to thinking about originality and how we all love to leave our own mark on this world. Thats such an important part of creating. Its a desire we all share.
I can't say my designs are completely original. They may begin with a simple pattern of which I can't seem to copy without changing its shape, size and dimension. Here are a few of my favorite patterns-


If you are a seller of your work its very important to draft your own patterns. Most designers will ask that you only use their patterns for personal use. Creating a pattern really is a challenging and rewarding experience. It frees you to sell your pieces without stepping on another artist's copyright. Although flattery is a compliment, it also really ticks some artists off, to the point that they deny Pinterest Pinning and occasionally post horrible things about you on their blogs or forums. I usually don't get upset. No two people ever do the same thing the same way. I just ask that you don't get rich on my designs with at least not giving me a bit of credit for your inspiration.

For those of you who want to do this, but can't quite find the time and feel exhausted just wondering how one would go about such an adventure, let me guide you through it.
I promise you a complete sense of satisfaction and pride when you apply this to your creating. The challenge is all just one step in the journey. So lets go!

Here are a few tools that may come in handy for this and other patterns.


Paper. I use grid paper for many of my patterns. It helps me to keep things symtrical. However, you can use scrap paper, newspaper, kraft paper or cardboard.
A soft measuring tape, a ruler, a protractor, a compass and an eraser. I suggest you create a prototype. For that you will need muslin, fiberfill, a sewing machine, needle and thread. It is very helpful to have a model or something close to the size of your finished project is optional so you can gauge the approximage size of your final pattern. A calculator is also necessary.

Step One-
Make your measurements. Begin with an object close to the size and shape of your desired pattern. I know its not fair that I am using a finished apple to show you the measurements, but stay with me. I'll make it clear how you can begin with simple ball shapes, such as the silver ornament above.


Here is an illustration showing you how these measurements become the foundation for a very simple shape. Note, you can easily flip this diagram upside down and create a pear pattern... and you thought that this was going to be hard.


Here is how to draft your pattern onto paper. Begin by recording all measurements. I am writing mine on the top upper corner of my pattern paper.
Then draw a line showing the height of your desired pattern. If you are beginning with a simple round shape, simply extend the tape measure up past the top of the ball and inch or two. Round the measuring tape off on top to simulate the curve of the 3-D object. (Its better to over estimate this measurement than under estimate it.)


Now you need to come up with your width measurements. Sorry, you will be needing a bit of math here, but it's not hard and you don't have to be exact.


Next add your 2 width measurements. Extend how big those areas should be.


Now its time to create a shape. Each end needs to come to a gradual point. The curve should be rather drastic. If the curve is long and gentle, you will create a pointed end. Not a great shape if you want your pincushion to sit straight up. It would just tip over. however, you may want that kind of a curve for the top of a bosc pear top.


You will need to join the two sections in the middle. You can curve that line in and make it shapely. If that line is straight from one section to the other, your final shape will look kind of squatty. Do what ever you like the best. Your the boss!


Now add a seam allowance all the way around your pattern shape. I usually use an approximate 1/4" allowance. This is one time that you don't have to be a perfectionist. Do what is comfortable. Just do it the same way each time for each section.


Once you think you have your pattern, I suggest that you create a muslin prototype. This is so worth the time. You don't want to use your favorite fabric only to find that your shape is not at all as you imagined.
Use muslin and cut 6 sections.

When I created my muslin prototype I realized that I wasn't too fond of the shape. I was close, but it just was off. Here is a photo of the final muslin shape, the original pattern draft and the final pattern piece.


Just a note. When adjusting your pattern, do it in small increments. Eveyr change will be multiplied by 6. A 1/4 inch change will create a 1 1/2 inch total different in the final piece. How can you determine just the right change? Why don't you pin little tucks or let out a few seams in your muslin piece. I often don't sew it completely shut, so I can remove the stuffing and make my changes on the original instead of having to resew a new muslin piece for each change.

Save your muslin piece. It makes a great tool for your embellishement design.


Here are some different versions of my pear pattern.
Just a few small changes in the pattern shape can make a big differnce in the final piece.

Here is my very first pear.


For this pear, I elongated the pattern. The top is longer and more drawn out than my first pear.


Just a note, using different fabrics can change the final shape of your pattern. These 2 apples are from the exact pattern. The pieced patchwork caused everything to be tighter and look smaller.
The original pattern is bigger and plumper. I love both of these apples


Experiment. Have fun. Once you have the outsides figured out, embellishment is next....oh the creative process just never ends.


Sunday, October 14, 2012

Tutorial- Autumn's Inspiration Leaf Brooch


Wisconsin is nearing it's bare naked tree season. Right now, the trees are glowing with brilliant gold, red, orange and chartruese. Walking through the park near sunset will take your breath away.
Each year about this time I'm inspired to create one of my fast favorites. I love making leave brooches. If you have a few wool scraps and a pin back, some beads and some floss, you can make one too. Its so easy!


I first gather a nice selection of leaves in a variety of shapes and sizes. This requires a brisk walk in the crisp autumn air. I love this step.


I choose a leaf I like and create a pattern.
If the leaf is the right size for a brooch, all you need to do is trace around it. If it's too large, simply draw the shape onto paper. If you aren't perfect, no problem. Nature create so many individuals.


Once my pattern is cut, I add a few design elements. This is helpful as it helps you to picture the final brooch. I often will go to my sketchbook and try a few different designs, thinking about materials and colors. Once I decide on a design, I pin my pattern onto a piece of felt and cut it out.


I use hand dyed felted wool for my brooches and pincushions. You can also use felt, linen is beautiful, a recycled felted sweater that's been felted or just about anything else you like. The rich colors of the dyed wool feels perfect for these brooches.


For this leaf I used brown velvet. I then embroidered leaf veins. I used beads to enhance the design. You can find this leaf brooch in my Etsy shop here.


This version is created using hand-dyed, felted wool. I added layers of wool roving separated by bits and pieces of wool yarn.


Once the felted the wool I add embroidery.
I couched the yarn. (Go back and forth over the yarn to secure it to the foundation fabric).
After the yarn and roving are felted and couched, I added more embroidery stitches to each section. You can find this brooch in my Etsy shop here.


This last leaf brooch is a very simple design. I added yarn and couched it onto the wool. I then added veins to the leaf with 2 strands of cotton floss in fall colors.
To finish the design I added tiny sead beads. On the dark side of the leaf I used metallic, opaque beads. To the lighter side of the leaf I used transparent sead beads with a gold luster finish. Find this brooch here.

To finish all styles, cut a piece of felt the same size as the finished brooch.
Use embroidery floss to join the front of the leaf and the felt together. A simple blanket stitch does the trick.


Add a pin back to the felt. Sew it on. Glue would eventually rip the felt. I like to add a small rectange of felt on top of the pin back to give it a professional look. It also keeps the brooch from flopping over on light weigh fabrics.

If fall leaves aren't your thing, you can create any design on wool the same way to create a brooch of your liking. If you don't have a wide selection of felted wools, try this brooch with felt.
If you use woven fabrics, such as linen or velvet, such as the brown oak lef above, you may need to rfray check the edges or sew the felt backign to the front right sides together and turn. Then sew your pin back on.

I like to use regular pin backs and a domed pin back on occassion. Use whatever you prefer on your brooch.

This brooch used the same materials. I just added bits and pieces of wool to create a little house scene complete with a sweet tree and flowers.
Find it in my Etsy shop here.


Give this a try. Its fun and you can complete this project in a day. How about using a holiday theme? A snowflake design? I once created a birthday brooch with a cake design enhanced with beads. The possibilities are endless!


Sunday, September 30, 2012

New Look Same Blog

Hello! I decided to change my logo and banner. I felt in the need for something clean and bold. I added my favorite pincushion. I also added a button to my blog. I would love it if you would grab it and pop it onto your blog.

While you are here, I thought I would share with you my 2nd obsession, right after fabric. I have a thing for decorative pins. If you've ever ordered a pincushoin from me, most all come with one or a few of these little beauties.

You can order them in a set of 10! They will come in a little fabric envelope with a ribbon. You can find them in my Etsy shop here. Perfect for a little stocking stuffer or a sweet gift for your favorite workshop instructor. Or, or course, keep em for yourself. I won't tell.


Hope you like the logo and I would love to see you back soon. I have a pear tutorial coming very soon.

Saturday, September 29, 2012

44th Street Fabric Giveaway Winner


I first want to thank every one who came over to my blog from 44th Street Fabric. I was so touched by your responses and your comments. I was overwhelmed! I also want to thank Bev from the very bottom of my heart. She is such a kind, generous and talented quilter and blogger. I am so grateful she found me!

Being my first giveaway I was a bit uncertain how one goes about this. I wanted to give everyone something. I thought that the fairest way was to put everyone's name in a container. I gave it a couple of shakes. Out came the winner's name.


Well enough of the suspense. The winner is Delcia R.!!!
Congratulations!

Please email me at jillverbick@gmail.com with your mailing address.
(I couldn't find your email info on your profile.)

This pincushion comes in a few different colors, let me know if you have a preference. I have it in a mix of colors as show above, all from the adorable 1030"s inspired prints. You can also get it in pinks and reds, blues and greens, a warm mix of yellow, red, pink and orange, or a cool mix of blue, green and purple. I have some pretty shabby chic rose patterns I really love. Just let me know what you would love!

I want you to know that I have been so inspired by all of your works. I spent the last few hours looking at your blogs and your quilts. Makes me wish I had the patience to work on a patchwork project for more than 20 minutes! Actually, I'm just learning how to paper piece and I am beginning to stitch together a little block using a quick flying geese technique. I hope it works out. Matching points is where I usually groan, rip, sew, rip again and eventually put everything in my UFO box. I do think I might be finally getting the hang of it. Maybe all of your talents will rub off on me.


Stop over to Bev's Etsy shop and check out some of her adorable fabrics and patterns. Here are some of my favorites!

Polka Dot Stitches from Lori Holt for Riley Blake Designs


Sweet As Pie Pincushion by Chitter Chatter


Don't forget...shop with me on Etsy and take 15% off your first order! Just use coupon code FiberBlog15.

Keep in Touch and come back soon!


Friday, September 21, 2012

Stitching Savvy

I absolutely love the many faces of embroidery! Everytime I pick up a needle and thread, I search my books and my brain for just the perfect stitch and the right thread for what I want to create. There are so many!


Many years ago I did a lot of cross stitch. It was the 80's and that was the thing to do back then. When I cam back to embroidery, about 4 years ago, I was determined to learn more.
Because there are so many colors, so many fibers, so many threads and so many designs its hard to know where to begin.


When I tried to reproduce what I saw, it all ended up looking like "me". Instead of fighting that, I embraced it! Every one of us stitch in their own unique way. As a painter, I wanted to use thread like a paintbrush.


But then again, sometimes I just want my embroidery to look like embroidery. All the traditions of this beautiful craft should be passed on to those after me and so on. With hand embroidery, there are no shortcuts. You can use an embroidery machine to do a myraid of designs but nothing looks or feels quite like what only the hand can create.


To inspire you to try and enjoy this beautiful craft, let me share a few of my secrets. These are things I've learned by doing. I stitch about 30-40 hours a week. Just about every one of my sewing projects is signed by my stitching. If you have tried to embroider, but found it too frustrating or difficult, maybe these secrets will bring you back to embroidery.

The tools of the trade

Crewel or Embroidery Needles. for most fabrics you will need a sharp point. I recommend you find the smalles hole to accommodate the thread you are using, keep it on the shorter side so it's easy to manange. A variety is always best.
A small, pointed scissors to snip threads in small spaces.
A thimble. I love my leather thimble the best. It is soft and conforms to the contours of my finger. It helps to avoid callouses and needle pokes. Treat your fingers well!

Floss and Fabric As many colors as possible!
Embroidery Hoop if desired.
A Pincushion to keep your pins organized and off of the floor.
Thats it!

Threading the Needle
Thread has two different ends! Yup, I'm not kidding, it does. You will find that to be very true of Perle Cotton. So how do you know what end to thread? If the thread mashes down and refuses to be threaded, attack it from the other end. You'll be amazed at how easy the other end works.
Thread your needle like you do any other thread. Dampen the thread with your tongue and then pinch the end with your fingers to make a flat, sharp end. Don't forget to put on your glasses. This is no time for vanity.

To Knot or not to Knot
Some experienced embroiderers do not create knots. I do. You don't need a huge one. Cut your thread close to the knot so you don't have to deal with a mess on the back of your work.
When you finish with a color or come to the end of your thread, bring the needle to the back of your work. Create your knot using threads from the back of your work. Do not bring the needle back up through the fabric. Start with one winding stitch by winding the needle around one of the back thread loops. Then make a standard knot using the same threads.

To Hoop or Not to Hoop
I rarely ever use a hoop. They always seem to get in the way and often deform my fabric or previous stitches. How do you get along without a hoop and still have nice flat stitching? Relax. I mean it. Your stitches should be taught but not tight. If you are feeling stressed or tense, stop and take a few deep breaths. As with crochet or knitting, your work will reflect your mood.

After I take a few stitches, I give my work a bit of a tug. I grab it from one end of my stitches to where I'm at. If you stitch calmly, you will be able to pull all your stitches to a uniform tightness. Any bunches will hopefully pick up the slack from looser stitches. If you find your work is bunching up and can't be pulled straight...go get a glass of wine, take a walk and come back later. Let your embroidery teach you to relax and simply enjoy the process of creating.

When your work is complete, I recommend that you block your work. I have as short tutorial here- Block Your Embroidery.


How do I keep my threads from tangling? Arrrgh!
You may have already guessed that this issue is common and somewhat impossible to avoid. However, these few tips may keep your tangles to a minimum.
First and foremost, don't cut your threads too long. I recommend about 18-24 inches, shorter with floss. Short threads are easy to manange.
After you cut your thread and separate your floss strands, run your fingers down the length of your thread a few times to smooth the fibers and untwist the strands. It also realligns the fibers.
Manage your thread by using spare fingers to hold the twisting thread straight while you pull it through the fabric.
Drop your needle straight down and let it dangle now and again. This allows the needle to turn and spin freely, unraveling twisted, kinked thread. Floss needs constant unwinding.
Perle Cotton is great because it rarely tangles and when it does, you can usually pull the loopy knots out with a firm tug. It needs to dangle now and again, like floss.
Take your time. If your thread knows that you are in a hurry, it conspires to tangle more often. Its true. If my threads are especially unruly I may trade it for another piece of thread.

Choosing the perfect thread.
The choices are endless. You can use the standard 5 strand floss. There is a number of sizes of Perle Cotton. You can stitch with silk ribbon. Wool thread is another awesome choice. I have stitched with yarn, quilting thread, cotton crochet thread and whatever else I can get to work. If you have a needle to accommodate the thread, use it!


I do most of my work with #5 Perle Cotton. It comes in many sizes, The smaller the number, the thicker the thread. Most commonly you will find size 3, 5 and 8. I have hundreds of colors and I still wish I had more! It creates a nice flat stitch that has substance, even when used on wool. When used in a satin stitch, it has a beautiful sheen.


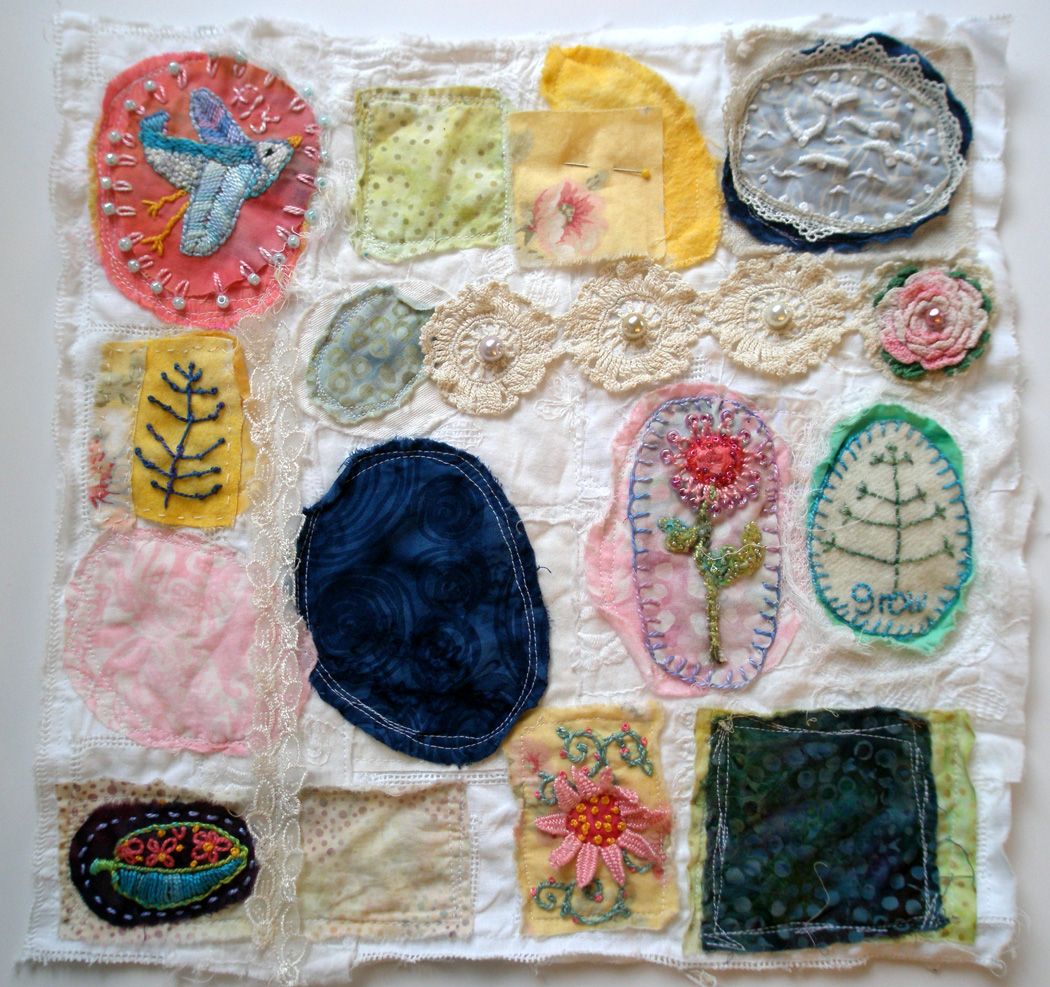
When I need a lot of detail, if I'm working on a fine fabric or if I need a wide variety of stitch thicknesses I use Embroidery Floss. Just cut to the length you need. You can use one strand, 2, 3, 4, 5 or 6 strands. Its your choice! In the example above you will see many single strand stitches. The have such a delicate look. The seem to float above the fabric with just enough presence. Floss comes in so many colors. Again, I wish I had more. Its very inexpensive, about 40 cents a hank. Each hank goes a long way.


Silk Ribbon is amazing, but it can be expensive and hard to find in the US. It comes in standard colors in a number of sizes and is beautiful when hand dyed. Because I buy so little of it, I often combine it with other fibers to create a number of textures.

What fabric should You embroider on?
You can use just about any fabric you want. However....


My favorite is linen because it has a nice even weave, (great for lettering). The needle glides through it so well. It is opaque so you can make a mess of the back of your work.


My next and equal favorite is Felted Wool. The needle slides through it like butter. Its such a joy because it comes in so many colors. Heavier threads seem to float to the surface while fine floss can be pulled tighter so they nearly disappear. It can be a bit drying to your skin so keep lotion handy if you are stitching for extended periods of time.


Many of my pincushions are created with cotton. Although these are some of my very favorite works, its hard on the fingers. The fabric has a tigher weave so the needle doesn't glide as easily as wool or linen. But I love using pattern and 3 dimensional form in combination with stitching.


Knits are hard, so you'll need a hoop and a stabilizer if you intend on a lot of stitches. The only knit I ever work on is felted wool sweaters. Its hard to keep the fabric from warping and stretching. I try not to let that keep me from using it. It has its own charm.

Staying Organized
Its easy to have a big hot mess on your hands once you start building your thread stash. I recommend a few things that really help me to keep things tidy, at hand and untangled.
Begin by transferring your thread from a hank to a bobbin. Bobbins are small paper or plastic rectangles with knotches made just for this purpose. I write the color number of the thread on the bobbin so when I run out, I know what to reorder. Bobbins are compact, can be stored in a bin or on a metal hoop. When you cut your thread, just stick the thread end into one of the knotches to keep things from unraveling all over the place. I am a horrible organizer, but I know that when my threads are a mess, I don't enjoy the process. I sort every thread by type and by color. Everythign is right there, easy to find and easy to keep neat. That gives me more time to play.

When you transfer thread to a bobbin, these techniques may make it easy.
Perle cotton comes in long hanks. Remove the paper band and unfold the treads. The two ends that are tied together will help you find the center of the loops. I sit on the couch and put my knees up. I place the loop over my knees, cut the two ends apart. Carefully begin to unwind the thread from the hank onto the bobbin. This keeps the threads taut and untangled.
When you transfer floss you only have a small loop to deal with. Find one end and slowly peel away the thread and put it onto the bobbin. Once you have your bobbin started, place the loop of threads around your left wrist. Continue to pull the thread off of the hank onto the bobbin. The loop will spin around your wrist and keep it from tangling.
(Photos coming soon.)

The Stitches
The last thing is what stitches are best. They all are, but I have about 7 stitches I use all of the time. They are easy and once you learn them, it becomes second nature to remember each step.
There are my favorites
The Back Stitch can be used to make any lines or letters.
The Button Hole or Blanket Stitch creates a beautiful clean edge.
The Chain or Lazy Daisy Stitch
The Satin or Shading Stitch to fill in larger areas.
The Couching Stitch to hold yarn or threads down onto the fabric surface.
I adore the feather stitch, fly stitch, bullion knots, split stitches and so many more!

You can always look online to find more stitches. I recommend watching videos. It all becomes clear when it's demonstrated. There are some wonderful blogs to follow that have step by step picture or video demonstration.
Here is my favorite- Needle N Thread by Mary Corbet
Pintangle's a TAST is great. Take a stitch Tuesday teaches you one stitch a week. Other embroiderers stitch along and you can post your work. Its fun and I really wish I had more time to do this on a regular basis.
I have a few tutorials showing my favorite, go-to stitches here.

Keeping your stitches uniform comes with practice. Embrace your imperfections. Most stitches are easy to undo and redo if you must. In time, you will find that your stitching is unlike no other. Thats a good thing. Let it become yours and yours alone.

I'd love to share with you a few of my very favorite embroidery and fiber artist. They inspire me everytime I see their work. They have lifted the art of stitching to a new level with their sense of playfulness, freedom, originality and talent.
Mimi Love is pure fun. She is from England and if you stop by her blog, its like a travel warp. Mimi is a bit of a poet she is.


Sally Mavor
She creates whimsical illustrations in stumpwork for her books. Her work is technically impecable with that perfect touch of childhood wonder.


Susan Elliott from her blog, Plays with Needles. She brings jewelry, trims, beads, you name it to her work. She has a fun, modern touch that reaches back from many years of tradition and drags the craft into the light of today. Its bright, sweet, elegant and fun(really fun).


I could go on and on showing you my embroidery heroes. I invite you to check out my blogroll and choose a few stitch related names. Yu'll be hooked.


Once you are bitten by the embroidery bug, try stitching a sampler. That will push you to learn new stitches, have a visual inventory so you know what each stitch looks like in person. So get out your supplies and get stitching!