Sunday, November 4, 2012

Fabulous Fiberluscious Pear Tutorial

I hope you enjoyed the patterns and tutorials of some of my favorite fiber artists. Since I've been promising my own tutorial, I didn't want to disappoint. Having an order for one of my crazy quilt pears made it easier. I made a simple pear which is currently available in my Etsy shop.


Lets get started.
Step one is to find fabrics that you like. You can do a single print, or as I have here, 5 different fabric prints. My crazy quilt version has over 15 batik colors and patterns! Its up to you. This is where you bring your creative signature to life!


Here are the tools and materials you will need:
Fabrics, pins, polyester fiberfill, scissors, sewing machine, needle and thread, stem materials. I used a raffia covered wire. I have also used a natural bark covered wire. If you can't find these, use a soft, bendable wire and cover it with paper and glue. I found my wire at the local garden store in their craft section.

You will also need emery or a material to weigh down your pear. You can also use crushed walnut shells or you can use gravel or sand. You only need about 3-4 Tablespoons.

If you plan on embellishing your pear, you will need embroidery floss and a crewel needle.


Here are the materials I will be using to create a crazy quilt pear. To make one like it, just piece many fabrics together and then cut out your pattern pieces. You will also need perle cotton embroidery thread and assorted laces and embellishments along with about 20 hours of embroidery stitching to bring it to life.

I think it's so worth it in the end...


Note: I am sad to say that the above pear is no longer available for special order. Its just too hard to stitch. If you have ever tried embroidery through a few layers of batik cotton you will understand. It takes a pliers! I have developed a replacement for this pear which I like quite a bit. It takes a bit to make but can be ordered with delivery in 3-4 weeks.


1.Lets choose your fabrics! I choose 5 flower print fabrics. I love their soft vintage feel. Don't forget to choose a fabric for your leaf.


Take your main pattern piece, (watch for my pdf pattern file tomorrow). From your 5 chosen fabrics, cut one piece from each print. Cut 2 pieces from your leaf fabric. This image is from my "How to Draft your Own Pattern Tutorial". I basically turned that pattern upside down to create my pear.


I like to play with the order of my fabrics until I find a pleasing combination. Using a water soluble marker, number your pattern pieces 1 through 5.


Then, with the same marker, I make a little dot at the tip of each pattern piece. it should be 1/4" of an inch down from the tip, right in the center. This is where all of your seams will meet. Do not sew past that dot.


The next step is to sew your pattern pieces together in order from 1-5.
Lay them out, right sides together and add a pin or two. When lining up you pattern pieces to sew, match the dots on both ends. Insert the sewing machine needle right into that mark to begin sewing. This allows you to have beautiful seams on the top and bottom of your apple or pear or any round patchwork. You cannot chain stitch this pattern.

I think it is helpful to press your seams open as you sew. You will want to add stay-stitching to the 2 outside edges before sewing the pear closed. This becomes very helpful when you close your final seams later.


Once you have your stay stitching sewn, sew the last seam. Leave a 2-3 inch opening for turning. The opening should be in the lower middle half of the seam, not on one of the ends. This makes it easier to close your opening neatly.


Reach in and "pop" the two ends of your patchwork. If you don't know what that means, its a technique often used in Dresden piecing. Before turning right side out, take the seams at the end of your pear and give them a bit of a twist. Then flatten the seams so they fan out and lay flat nicely. I don't have an image for this just yet. If you have ever watched Fons and Porter on PBS, they get really excited demonstrating how to "pop" a converging seam. If you don't get it, don't worry.

Turn your pear right sides out.
You will need to create a muslin pocket with emery or another weighted materials such as crushed walnut shells or even sand. I just joined two round pieces together, filled them with emery and closed the seam. I pinched the top of the circle together and stitched it together so the bottom of the pocket is nice and round and full.

For more information on emery, go to my post, "Magical Emery".
Insert your emery pocket into the bottom of the pear.


Using little wads of polyester fiberfill, begin filling your pear. Be sure to pack it tightly, especially in the top section and around the emery pocket. Once you think you have enough in there, add more. Examine your pear from every angle and fill any indentations. I use a stylus stick or the eraser end of a pencil to poke it into every little space. This gives your pear a beautiful shape and makes it very useful as a pincushion.


Close the opening up by hand. If you would like to know how to close your stuffed items with a nearly invisible seam, go to my tutorial on The Classic pincushion. Here is a quick look at how I baste the edges down first. I then take tiny stitches from one side to the next to close the seam.


At this point, I added embroidery stitches along each seam. Embroidery is kind of "my thing". Its my special touch and it identifies me among other artists doing the ssme thing. I totally recommend that you get a "thing". It will make you proud.

Back to the the final stages.
Create a leaf for your pear. I have a few versions but I put them together the same way.
Cut out your pattern. If you choose to embroider veins on your leaf, now is the time to add your stitches. Pin the pieces together. Sew around both ends but leave a 1 inch opening on one of the sides. I use a pinking shears to trim the outer selvages or you can clip the corners.


Turn right side out and stuff.


Close up the opening.


Next add the stem. Sorry I forgot to take a photo of this. Its simple. Clip the very end off of the skinniest part of the leaf. Insert the wire. In pushing the wire in, the end of the fabric will turn under. If not, use a tweezer to coax the raw edge under. Sew the fabric tightly closed around the stem.
Here are two different leaves with the stem inserted.


Take a longer piece of covered wire. This will be the main stem. Join both stems together. I find it helpful to use floral tape to join them. I also find it helpful to take a bit of white glue to the raffia at each end. Let it dry so the ends of the wire are stiff and easy to poke into the pear later.


You will need to create an opening in the pear to accept your stems. I use a large yarn needle. If the top of your pear is completely closed, you may need to use a stitch ripper to loose the top stitches. Then take a pen or pencil and dig it deep into the hole you've created. You need to make way for the stem.


Now carefully insert your stems into the top of the pear.


Once in, arrange the leaf so it droops down. Give the longer stem a bit of a funky twist. You can also cut it shorter if you prefer.
You are done!


After looking at other pear tutorials, I realize how I tend to complicate my pieces with all kinds of special features and new techniques. I really don't apologize for that. In fact, I like putting something extra into the things I do.

My husband often checks the kitchen cabinet for the box of "love" I add to my dishes. He says I cook like no other. Not that I'm an expert at cooking or sewing. I just really care deeply about creating good, beautiful, sturdy, useful things.

I hope that my legacy is that I put a lot of me into this world and that the mark I left is a good one.

Have fun and be wonderful in your mark making!

Check out these Sweet Pear Tutorials

Here are some amazing tutorials. I'm going to spread the love here because my method is so similar to these artists, yet, each one of us has something wonderful to bring to the same pattern.


The 1st is from PositivelySplendid.Com
It is such a beautiful tutorial with lots of pictures to guide you from start to finish. I know its a pumpkin, when we are thinking pears, but the pattern and construction are very close and I really wanted you to see her work.
Amy is so talented and she has an incredible variety of tutorials from t-shirts and pillows to a whimsical, colorful Christmas stocking- all stunning, original and drool worthy. Take a look!

Here is a sweet tutorial from April Moffatt Design. Simple and sweet.
April has some beautiful home dec tutorials you will want to try. She even has a cake decorating tutorial! Outstanding and very original. Many of her projects, such as her lovely ring bearer's pillow has been featured on the cover of Crafts N' Things! She has also contributed to other Crafts N' Things and Stitch Magazines. She has a lovely site and blog and some adorable tutorials. Stop on by and check out her tutorial here.


Its a small world. Here is a pear pincushion from Queensland! There is something so universal about our love of fabric and the joy of creating! Susanna creates for kids and she has a little legging tutorial that is so cute.
Here is a quick pear tutorial on Handmade in Bikkurim's Pear Tutorial

She swears it takes only 20-30 minutes although it's hard to believe you can get that much cuteness out of less than an hours work. Wish I could simplify every once in a while!
Take a look at her Etsy Shop and see what she has for your little one!


One of my very favorite finds is RetroMama by Kim. You can find her work here- in her Etsy Shop. and her Her Blog-


Patterns are great when you just want to share your love of creating with someone else. Send them one of her kits here!

Check out her Etsy Shop and see more of her totally sweet patterns and products!
Her sweet fabric house ornaments were featured in the "Make It" issue of Better Homes and Gardens. I emailed her to tell her how much I enjoyed the article and how much I love her shop and she graciously responded with encouragement. You know... artists are just the nicest people.
Kim has designed sweet softies, buntings, tea cozies and so much more. She also carries a line of brilliant felts in her shop so you can create some of her patterns with some of the same high quality materials she uses.

Now for my tutorial. It's about time, don't your think! I hope you give it a try! I encourage you to take any pattern you find and make it your own. No one sews, no one imagines, no one chooses fabrics just like you. Add your own style and go for it!


Saturday, October 20, 2012

How to make a Pattern for an Apple Pincushion


Ta da! My newest apple on Fiberluscious.

I had just planned on making a PDF pattern for my pear pattern, which I will, I promise. But I got to thinking about originality and how we all love to leave our own mark on this world. Thats such an important part of creating. Its a desire we all share.
I can't say my designs are completely original. They may begin with a simple pattern of which I can't seem to copy without changing its shape, size and dimension. Here are a few of my favorite patterns-


If you are a seller of your work its very important to draft your own patterns. Most designers will ask that you only use their patterns for personal use. Creating a pattern really is a challenging and rewarding experience. It frees you to sell your pieces without stepping on another artist's copyright. Although flattery is a compliment, it also really ticks some artists off, to the point that they deny Pinterest Pinning and occasionally post horrible things about you on their blogs or forums. I usually don't get upset. No two people ever do the same thing the same way. I just ask that you don't get rich on my designs with at least not giving me a bit of credit for your inspiration.

For those of you who want to do this, but can't quite find the time and feel exhausted just wondering how one would go about such an adventure, let me guide you through it.
I promise you a complete sense of satisfaction and pride when you apply this to your creating. The challenge is all just one step in the journey. So lets go!

Here are a few tools that may come in handy for this and other patterns.


Paper. I use grid paper for many of my patterns. It helps me to keep things symtrical. However, you can use scrap paper, newspaper, kraft paper or cardboard.
A soft measuring tape, a ruler, a protractor, a compass and an eraser. I suggest you create a prototype. For that you will need muslin, fiberfill, a sewing machine, needle and thread. It is very helpful to have a model or something close to the size of your finished project is optional so you can gauge the approximage size of your final pattern. A calculator is also necessary.

Step One-
Make your measurements. Begin with an object close to the size and shape of your desired pattern. I know its not fair that I am using a finished apple to show you the measurements, but stay with me. I'll make it clear how you can begin with simple ball shapes, such as the silver ornament above.


Here is an illustration showing you how these measurements become the foundation for a very simple shape. Note, you can easily flip this diagram upside down and create a pear pattern... and you thought that this was going to be hard.


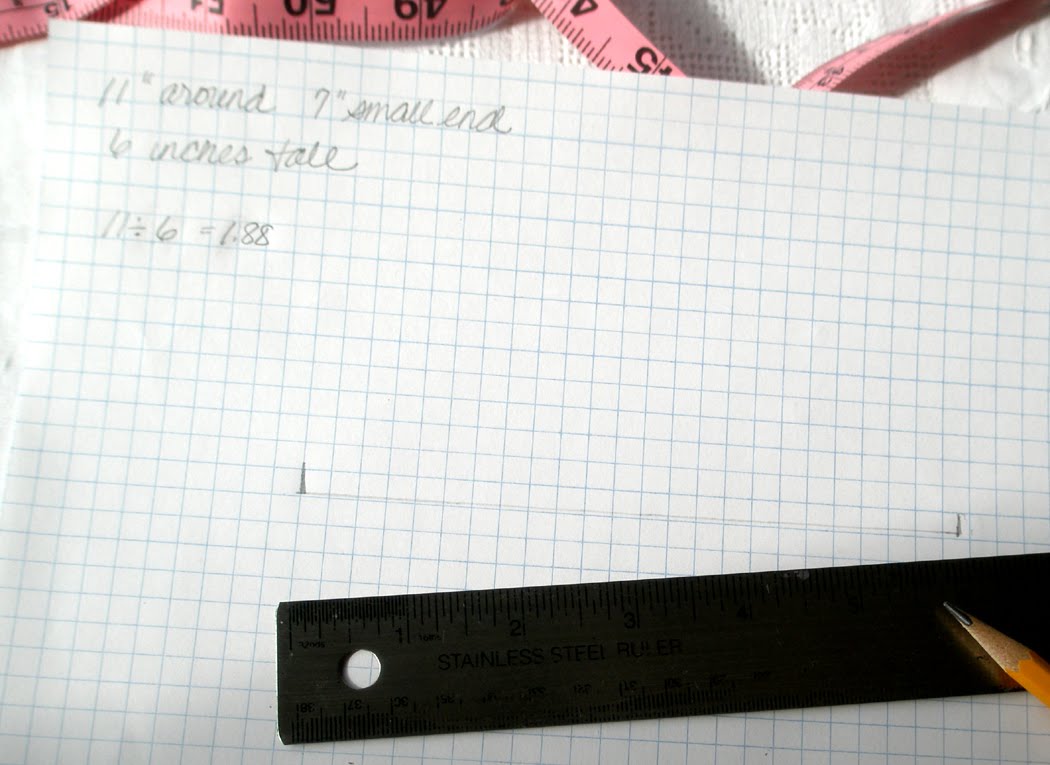
Here is how to draft your pattern onto paper. Begin by recording all measurements. I am writing mine on the top upper corner of my pattern paper.
Then draw a line showing the height of your desired pattern. If you are beginning with a simple round shape, simply extend the tape measure up past the top of the ball and inch or two. Round the measuring tape off on top to simulate the curve of the 3-D object. (Its better to over estimate this measurement than under estimate it.)


Now you need to come up with your width measurements. Sorry, you will be needing a bit of math here, but it's not hard and you don't have to be exact.


Next add your 2 width measurements. Extend how big those areas should be.


Now its time to create a shape. Each end needs to come to a gradual point. The curve should be rather drastic. If the curve is long and gentle, you will create a pointed end. Not a great shape if you want your pincushion to sit straight up. It would just tip over. however, you may want that kind of a curve for the top of a bosc pear top.


You will need to join the two sections in the middle. You can curve that line in and make it shapely. If that line is straight from one section to the other, your final shape will look kind of squatty. Do what ever you like the best. Your the boss!


Now add a seam allowance all the way around your pattern shape. I usually use an approximate 1/4" allowance. This is one time that you don't have to be a perfectionist. Do what is comfortable. Just do it the same way each time for each section.


Once you think you have your pattern, I suggest that you create a muslin prototype. This is so worth the time. You don't want to use your favorite fabric only to find that your shape is not at all as you imagined.
Use muslin and cut 6 sections.

When I created my muslin prototype I realized that I wasn't too fond of the shape. I was close, but it just was off. Here is a photo of the final muslin shape, the original pattern draft and the final pattern piece.


Just a note. When adjusting your pattern, do it in small increments. Eveyr change will be multiplied by 6. A 1/4 inch change will create a 1 1/2 inch total different in the final piece. How can you determine just the right change? Why don't you pin little tucks or let out a few seams in your muslin piece. I often don't sew it completely shut, so I can remove the stuffing and make my changes on the original instead of having to resew a new muslin piece for each change.

Save your muslin piece. It makes a great tool for your embellishement design.


Here are some different versions of my pear pattern.
Just a few small changes in the pattern shape can make a big differnce in the final piece.

Here is my very first pear.


For this pear, I elongated the pattern. The top is longer and more drawn out than my first pear.


Just a note, using different fabrics can change the final shape of your pattern. These 2 apples are from the exact pattern. The pieced patchwork caused everything to be tighter and look smaller.
The original pattern is bigger and plumper. I love both of these apples


Experiment. Have fun. Once you have the outsides figured out, embellishment is next....oh the creative process just never ends.


Sunday, October 14, 2012

Tutorial- Autumn's Inspiration Leaf Brooch


Wisconsin is nearing it's bare naked tree season. Right now, the trees are glowing with brilliant gold, red, orange and chartruese. Walking through the park near sunset will take your breath away.
Each year about this time I'm inspired to create one of my fast favorites. I love making leave brooches. If you have a few wool scraps and a pin back, some beads and some floss, you can make one too. Its so easy!


I first gather a nice selection of leaves in a variety of shapes and sizes. This requires a brisk walk in the crisp autumn air. I love this step.


I choose a leaf I like and create a pattern.
If the leaf is the right size for a brooch, all you need to do is trace around it. If it's too large, simply draw the shape onto paper. If you aren't perfect, no problem. Nature create so many individuals.


Once my pattern is cut, I add a few design elements. This is helpful as it helps you to picture the final brooch. I often will go to my sketchbook and try a few different designs, thinking about materials and colors. Once I decide on a design, I pin my pattern onto a piece of felt and cut it out.


I use hand dyed felted wool for my brooches and pincushions. You can also use felt, linen is beautiful, a recycled felted sweater that's been felted or just about anything else you like. The rich colors of the dyed wool feels perfect for these brooches.


For this leaf I used brown velvet. I then embroidered leaf veins. I used beads to enhance the design. You can find this leaf brooch in my Etsy shop here.


This version is created using hand-dyed, felted wool. I added layers of wool roving separated by bits and pieces of wool yarn.


Once the felted the wool I add embroidery.
I couched the yarn. (Go back and forth over the yarn to secure it to the foundation fabric).
After the yarn and roving are felted and couched, I added more embroidery stitches to each section. You can find this brooch in my Etsy shop here.


This last leaf brooch is a very simple design. I added yarn and couched it onto the wool. I then added veins to the leaf with 2 strands of cotton floss in fall colors.
To finish the design I added tiny sead beads. On the dark side of the leaf I used metallic, opaque beads. To the lighter side of the leaf I used transparent sead beads with a gold luster finish. Find this brooch here.

To finish all styles, cut a piece of felt the same size as the finished brooch.
Use embroidery floss to join the front of the leaf and the felt together. A simple blanket stitch does the trick.


Add a pin back to the felt. Sew it on. Glue would eventually rip the felt. I like to add a small rectange of felt on top of the pin back to give it a professional look. It also keeps the brooch from flopping over on light weigh fabrics.

If fall leaves aren't your thing, you can create any design on wool the same way to create a brooch of your liking. If you don't have a wide selection of felted wools, try this brooch with felt.
If you use woven fabrics, such as linen or velvet, such as the brown oak lef above, you may need to rfray check the edges or sew the felt backign to the front right sides together and turn. Then sew your pin back on.

I like to use regular pin backs and a domed pin back on occassion. Use whatever you prefer on your brooch.

This brooch used the same materials. I just added bits and pieces of wool to create a little house scene complete with a sweet tree and flowers.
Find it in my Etsy shop here.


Give this a try. Its fun and you can complete this project in a day. How about using a holiday theme? A snowflake design? I once created a birthday brooch with a cake design enhanced with beads. The possibilities are endless!